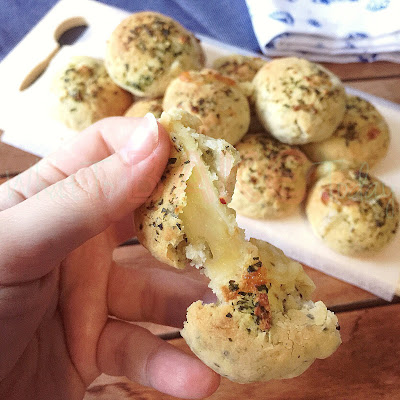
These Garlic Herb Cheese Bombs are the perfect morsels of buttery, garlicky goodness, each bursting with melty cheese! Awesome as appetisers, snacks or like me, eat a lot more as a light meal. If you already love having cheese on garlic bread, you will love these cheese-filled, tender, garlic butter biscuits even more! A must-try recipe for you!
Garlic Herb Cheese Bombs (makes 24 bite-sized snacks)
240g Plain flour
15g Sugar
5g Garlic powder
5g Dried Italian herbs
2g Salt
1g Pepper
10g Baking powder
80g Butter, cold, unsalted
175g Buttermilk, cold (adjust more or less accordingly)
240g Mozzarella cheese, cut into 24pcs
To brush on
50g Butter, melted, unsalted
10g Garlic, minced
5g Parsley, chopped
1g Salt
Preheat oven to 200°C
1. Mix evenly the flour, sugar, garlic powder, Italian herbs, baking powder and salt. Add in the butter, then using a knife/fork/pastry cutter to cut it through the flour mixture till it resembles breadcrumbs.
2. With a fork or spatula, slowly stir in the buttermilk, bit by bit, and mix till the dough just comes together. You may require more or less than the stated amount. Then briefly knead the dough with your hand (just under 10 kneads) till it no longer sticks to the side of the bowl . Cling wrap and rest dough in fridge for at least 20 mins.
3. On a lightly floured surface, roll the chilled dough out to a rectangular shape, approximately 5 mm thick and cut the dough into 24 pieces.
4. Wrap a piece of mozzarella cheese in each piece of dough, making sure that all the edges are sealed well. Roll them into a ball before placing on a lined baking sheet.
5. Melt butter in microwave and add to the minced garlic, chopped parsley and salt. Gently brush on the garlic butter mixture onto the cheese bombs. Bake 15-17 mins till golden brown.
6. Remove the cheese bombs from the oven, let cool slightly and serve immediately.
If you like this recipe and would like to share it, please link to this blog post with its original contents. All recipes are created by me (unless otherwise stated) and require a lot of effort and time to craft. Crediting back is the biggest form of encouragement for me! Thank you! =)
As for the buttermilk, I would advise not adding all at once. I started with 150g and drizzle in 1 teaspoonful each time till it reaches the consistency I'm after. In the end, I used 165g for this particular bake. If the dough becomes too wet and tacky; more flour has to be added just so it can be handled properly, the resulting bake will be tough with tight crumbs. It's one lesson I learned the hard way through my past failures.
There are 2 minor changes I would make for the next bake though. I might increase the amount of salt in the dough, swap Mozzarella for Cheddar or grate some Parmesan on top of the bombs before baking. While I find the bombs a little under-seasoned, the rest of the family thinks it's all good. I don't know, it could be me tasting differently due to hormonal change but I would still like to try those changes. The other thing would be to separate the chopped parsley in the garlic butter mixture and have them sprinkled on only towards the end of the baking time. Applying them from the start dries out the fresh parsley too much, making them lose its fragrance and colour. Not really a big deal, I just thought they look pretty awful on the photos so I can improve them the next time or rather, *ahem* have excuses to make more!
But one thing for sure is that calling these "cheese bombs" are not at all exaggerating. Just look at that cheese go!
Try these cheessssey bombs, with or without my proposed changes, and share with us your yummy creations and thoughts on facebook or tag @whattobaketoday on instagram!
All blog posts and photos are properties of WhatToBakeToday (unless otherwise stated). Unauthorized use and/or duplication of these contents, whole or part thereof, without express or written permission from this blog's author is strictly prohibited. Excerpts and links may be used, provided that full and clear credit is given to WhatToBakeToday with appropriate and specific direction to the original content.


Can I use a mixer to do the job of kneading?
ReplyDeleteHi Lisa! I wouldn't suggest using a mixer since biscuit dough is delicate and needs to be worked with gently. A mixer will overwork the dough, allowing gluten to develop and result in a tough texture.
DeleteI used a fork to cut the butter through the flour with, and I used the same fork to stir in the buttermilk. When the dough comes together, I just give it a few brief kneads in the bowl, less than 10, and it's ready to rest and chill.
Thank you for asking~ 😊 I hope this helps clarify your question. Have edited the instructions to be clearer now too.