Pizza Tartlet

The idea of making hors d'oeuvre struck me suddenly as I watched Ina Garten prepare appetizers for her guests in Barefoot Contessa. And hey, what's easier than making a "pizza"? When we were young and pizzas were a real real treat, even rarer than McDonald's. Rest of the time, we can only buy "pizza bread" from the local bakeries. I remember Mummy making these "pizza breads" outta white bread and sausages, packing them for my lunch box when I was in primary school. And during my secondary education, my class made "pizza breads" for the charity food and fun fair, it was a total blast! We topped in earnings if I'm not wrong. Hahaha.. correct me please, old friends. Those were good times......

Ready-made, frozen puff pastry are quite common in supermarkets. Just search about the frozen pies section and they're usually there (not all the supermarkets have them though) else the baking supplies specialists usually carries them. I was about town area last week, and was pleasantly surprised to see them on sale for S2.50/packet! So I'm gonna use them as the base for these pizza tartlets. You can also use them for Curry Puffs.
Pizza Tartlet (makes at least 15)
     1     box of ready-made Puff Pastry (about 500g)
150g    Marinara sauce (aka pasta/spaghetti/tomato sauce), homemade or store bought
  80g    Ham ends (may substitute with other hams or toppings as desired)
  50g    Mozzarella & Sharp Cheddar, shredded (or your favorite cheeses)
     1     Egg, beaten

I think ham ends does the job really well. Although they are bits and pieces from all kind of hams but they are cheap (like SGD2?), already cut into bite-sizes and the flavours they produce together is awesome, as with all things that's mixed up (e.g. Rojak and our culture.. lol), I can't quite explain. Your guests will never know they are ham ends anyway. The only thing they'll know is that they taste fantastic! (You may prepare this with the Creamy Mushroom Chicken & Caramelized Onions Tartlets too. =D)

Ok! Before getting down to business, defrost your puff pastry according to the instructions on the package, usually involves leaving them at room temperature for 1 - 2 hours, so remember to plan beforehand. =)

Preheat oven to 180º C
I experimented with 2 methods of doing this, you can decide which you'll prefer.

Method A
  • Roll puff pastry out to a 0.5cm thickness on a slightly floured countertop. Using a fluted cookie cutter (about 7cm in diameter), cut out at least 20 fluted circles (should get >20 actually).
  • Use a smaller round cookie cutter (about 5.5cm diameter) as guide; score a smaller circle on the fluted circle using a small knife. Maintain a light touch and be careful not to cut through the pastry.

Method B
  • Roll puff pastry out to a 0.5cm thickness on a slightly floured countertop. Using a fluted cookie cutter (about 7cm diameter), cut out at least 15 fluted circles.
  • Using a smaller round cookie cutter (about 5.5cm diameter), cut out 15 circles.
  • Dab a little egg wash in the middle of each fluted circles. Place one smaller circle atop and press gently.

1. Egg wash the area outside the small circle. Spread a layer of Marinara sauce on the small circle, lay on some ham ends and top with some cheese.
2. Bake for 15-18 mins till puff and golden brown. Or if desired (and recommended), bake for 10 mins, remove from oven and top with more cheeeeeeeeese! Return to oven for 5-8mins more. 

The one with the smaller circle on top will taste "crispier" due to the additional layers but both methods are fine, both taste just as great. Aesthetically, the one with the small circle stacked on top (picture below) will rise higher, the one with the scored circle will look like the one straight at the top.
Now, regardless which method you used, you are going to end up with lots of trimmings. (-.-||) As with all puff pastry dough, it will lose its layers if you mix and knead them together but I don't want to throw them away and waste food. So I kneaded and rolled out the trimmings into a pizza dough!! Spread a thick layer of delicious Marinara sauce, put on a whole batch of ham ends and topped it with loads of cheeeeeese! 
Bake them at 200º C for about 15-20mins and you'll have a thin crust pizza! You'll never think about getting pizzas from "certain pizza or pasta chains" again, heck you might not even want to get pizzas outside again. What can beat a freshly made pizza, straight out of the oven?!

The beauty of these hors d'oeuvre is they are so easy to make and assemble. You may even prepare them way beforehand, keep them in the fridge and bake them fresh when your guests arrive. This uses the same puff pastry as Creamy Mushroom Chicken & Caramelized Onions Tartlets, you can prepare them together too! Hope that'll give you a great idea for your next party. Time to stock up on puff pastry again!


All blog posts and photos are properties of WhatToBakeToday (unless otherwise stated). Unauthorized use and/or duplication of these contents, whole or part thereof, without express or written permission from this blog's author is strictly prohibited. Excerpts and links may be used, provided that full and clear credit is given to WhatToBakeToday with appropriate and specific direction to the original content. 

Marinara Sauce

Pasta lovers will agree that one of the key aspect to making good pasta is to have a good sauce. With the advancement of technology, not many people make theirs from scratch anymore. How many of us are guilty of warming a jar of pre-made pasta sauce together with some grounded meat, canned mushrooms, perhaps some bell peppers, poured it over cooked pasta and claimed it as your own? I know I did when I first started cooking during my childhood.

No doubt it is quick to prepare, hassle free and almost like an instant hot meal. It is, however, still a "canned" sauce; most of them choked full of sodium and sugar (even when it says "100% natural", it could be "natural" flavourings.). There are a couple of jarred sauces that has lower sodium and sugar level, but they cost way higher than the already premium prices.

[Quoted from Wikipedia]
Marinara (mariner's) sauce is a southern Italian tomato sauce usually made with 
tomatoes, garlic, herbs, onions and sometimes seafood.

Although in Singapore, Marinara is more commonly associated with seafood and it is more likely that patrons would expect seafood in their pasta. I think this is changing as more diners becomes "food savvy", but outside of Asia, it commonly refers to just a tomato based pasta. I supposed the confusion is ok, as long as it is common understanding amongst the locals. Our culture is rojak (mixed up) enough anyway. However, don't expect to see seafood in your spaghetti alla marinara when you visit Italy or the server might flip the whole plate in your face. 

It is really simple to make Marinara sauce at home. Not only is it cost effective, it is fresh and healthier. You can control its saltiness, sweetness and tanginess. Or spice it up a little, the way Singaporean likes it. You can even make a large batch when you have the time and only need to warm it up when needed. Below is a basic Marinara recipe, when using, feel free to add grounded meat, seafood, mushrooms, eggplants or anything you fancy. 

It's wrong, and will probably make an Italian nonna faint but I like mine chunky style. If you want a smooth sauce, finely minced the onion or have the final mixture pushed through a sieve.
Basic Marinara Sauce (serves 2)
    3     Tomatoes, peeled and diced
    6     Cloves of Garlic, finely minced
 1/2     Yellow onion, diced
 60g    Stock, beef or any preferred
1 tsp    Olive Oil
    1     Bay Leaf
Salt, Sugar and Pepper to taste

Optional: a dash of the following herbs
  • Basil
  • Rosemary
  • Oregano
  • Thyme
If you don't the herbs, 1.5 tsp of either mixed herbs or italian herbs will be equivalent. The classic pairing of tomatoes and basil works really well for me, so I'll add an extra dash there.

1. Heat olive oil over Medium heat. Sauté the finely minced garlic and diced onions till fragrant. Add the diced tomatoes.

2. When the tomatoes starts to break down and release its juices, add your preferred stock and bay leaf.

3. Turn down to LOW heat when mixture starts to bubble. Remove Bay Leaf and season with salt, sugar and black pepper to taste. Leave to simmer for about 20-30 mins. Keep a good eye on it, making sure it does not burn.

4. Add sauce to desired ingredients or serve immediately over cooked pasta! Viola~ 

If you would like to store the remaining sauce, wait for the mixture to cool completely and store in a sterile container. It will keep for 5-7 days in the refrigerator. Or pack them individually, freeze them solid and they will keep up to 6 months in the freezer! Thaw at least 4 hours before use, or just throw them in the chiller compartment the night before use. 

Update (17th July 2015)
Macro Pierre White mentioned during a Masterclass he held for Masterchef Australia 2015 that a Marinara made using only fresh tomatoes will turn up orangey instead of red. I never really noticed that and it never bothered me, but I do get what he said "everyone expects a red sauce"! His solution to this kink is to add passata (canned tomato puree) to the sauce and gives it the colour everyone is familiar with. He also used cherry tomatoes in place of normal tomatoes for its intense flavour and higher content of pectin. 
!


All blog posts and photos are properties of WhatToBakeToday (unless otherwise stated). Unauthorized use and/or duplication of these contents, whole or part thereof, without express or written permission from this blog's author is strictly prohibited. Excerpts and links may be used, provided that full and clear credit is given to WhatToBakeToday with appropriate and specific direction to the original content. 

How to peel a Tomato

As simple as it sounds, things can get real messy if you don't know how to go about doing this. Most of the time, I don't think it is necessary to skin a tomato but there are certain recipes where a skinned tomato is more suitable else the skin might not taste so good. Otherwise, just leave the skin on.
How to peel a Tomato

1. Bring a pot of water to boil and add the tomatoes.

2. Leave them inside for about 1 minute or so. The skin will starts to peel back.

3. Heat off. Remove tomatoes and dunk them into Ice Cold water immediately. It will stop the cooking process and makes them easier to handle.

4. Gently peel back the tomato's skin. Done! =)

It's very simple to skin a tomato. So next time if a recipe calls for peeled tomatoes, you'll know what to do.


All blog posts and photos are properties of WhatToBakeToday (unless otherwise stated). Unauthorized use and/or duplication of these contents, whole or part thereof, without express or written permission from this blog's author is strictly prohibited. Excerpts and links may be used, provided that full and clear credit is given to WhatToBakeToday with appropriate and specific direction to the original content. 

Cherry Garden Restaurant (樱桃园)

In view of Father's Day, I posted on Wah Lok Cantonese Restaurant 2 days before the occasion, in hope that it might help anyone who's thinking of bringing their family there. For our own celebration, since we had visited Wah Lok just the week before, the family decided to bring our dim sum brunch to Cherry Garden Restaurant. Prior to this, I have heard nothing nor even know of its existence, so I was pretty excited. Yay! ヽ(^^)ノ

Cherry Garden Restaurant
5th Floor,
5 Raffles Avenue, Mandarin Oriental Hotel
Singapore 039797
Call for reservations: 6885 3538

If you're not new to my blog, it wouldn't be surprising to know that I'm a direction idiot. Haha.. I am especially afraid of travelling alone on public transports; I have a tendency to lose myself even in Singapore. I have waited at Sim Lim Tower when I was told to go Sim Lim Square. And I have also waited at Sim Lim Square when told to meet at Funan IT Mall. The Marina Square area is one such place where it is all too confusing (too many hotels in the vicinity - Pan Pacific, Marina Mandarin, Mandarin Oriental, Ritz-Carlton); I will almost always end up at the wrong hotel if without the company of friends or family. Since I was with family, I tagged along happily. 

We reached Marina Mandarin shortly before 11am, only to realized we're at the wrong place. To further confuse us, they have Peach Blossoms (鸿桃轩) there. Haha.. Peach? Cherry? Marina Mandarin? Mandarin Oriental? Geez... (^_^;) In order not to be as blur as us, it is Mandarin Oriental, the one nearer to the cinema in Marina Square, the one opposite Marina Bay Floating Stadium.

I vaguely remembered Free Valet was offered instead of the usual complimentary car park coupons. It is our first visit, who would dare to go valet? If you're going to dine there and complimentary valet wasn't offered, please don't come back and spat on my blog. I can't recall for sure, so don't take my word for it. >.<

We opted for the $48++ Dim Sum buffet which includes unlimited pre-selected dim sum, an order of appetizer, soup, main and dessert for each person. There's the Champagne Dim Sum option for those who want a little pampering on the weekends; it'll include unlimited everything on their pre-selected menu and free-flow champagne. It will also damage your pockets for $118++. 

The pre-selected dim sum variety is quite limited (didn't count how many is offered but I safely assume not more than 20) but since it is our first visit, we weren't sure what to try exactly so we kinda "ti-kam" and ordered a few apart from Char Siew Buns which is our staple when it comes to dim sum.
 

While loving Wah Lok's Char Siew buns, I did mention that if any improvements were to be made, I would like the fillings a tad saltier. Cherry Garden's Kurobuta (黒豚) Char Siew buns achieved what I described, perhaps substituting with Kurobuta is really all that matters. However, despite having superb fillings, the skin was too moist and slightly clumpy, it falls apart very easily. Although this is my favorite dim sum from Cherry Garden, but on a comparison note, Wah Lok's char siew buns still stand out. 
We had an array of other steamed dim sums - Xiao Long Bao (小笼包), Pork & Chives Dumplings (韭菜饺) and (apparently) Shark's Fin Dumplings with Dried Scallops and Prawns. They were good but nothing extraordinary, like their counterparts from Wah Lok's, no "wow" factor. In fact, I didn't know it was a Shark's Fin Dumpling up until now. 
The Mini Abalone Siew Mai seemed like the most promising item on the menu as I glanced through. It is really quite ingenious and adorable to embed mini abalone into traditional siew mai. The mini gems were tender and not chewy as how they can be at times. However, there isn't any abalone's distinct flavour and tasted like a normal siew mai. If you put me on a blind test, I don't think I can tell the difference.
Chicken Feet (凤爪) and Steamed Pork Ribs (豆鼓蒸排骨) are my personal dim sum essentials. The well seasoned ribs were soft and tender and the chicken feet were stewed perfectly. However, I do find the cloves overpowering on the chicken feet and it's too salty. This 2 items will go hand-in-hand with the next dish.
Some people might skip the carbohydrates section to "make the most worth" out of the buffet. However, the simpler the dish, the easier it is to screw up. To see if the chefs are skillful, go ahead and order a bowl of their Century Egg Congee or Kurobuta Char Siew Fried Rice (they have other offerings for this section). Albeit smooth, my congee tasted like glue and was poorly seasoned. Shouldn't a good bowl of HK congee be one that is thick, smooth but doesn't coats the back of your throat or the root of your mouth? However unfortunate, if you have already ordered congee, dipping the chicken feet and pork ribs into this rice paste will salvage it a little and make it palatable. 

The fried rice is better and is properly seasoned (but it took about 45 mins? to be served). You can see the rice "grain-by-grain" (粒粒分明) which usually requires a good "wok heat" (锅气 or "wok hei" in Cantonese) and an experienced enough chef. The flavour, however, is a little flat.
I'm sorry if this is your favorite restaurant and I haven't made much favorable comments on its dim sums. I know I shouldn't say this if I don't want to incite anyone's hatred. But to be honest, I never thought anyone could screw up on soups, Chinese soups especially. (x_x) With enough ingredients and a tactful mind, anyone can create a bowl of flavourful soup. Not that I am an expert but an 11 years old me could make palatable soup daily, according to Mummy's instruction. I had the Double Boiled Shark's Cartilage soup (don't think this is the exact name). I was so looking forward to it as I have had incredibly, awesome, gelatinous shark's bone broth at Summer Pavilion, Ritz-Carlton. Sadly, this fishy soup tasted of only light soya sauce. I took a spoonful and wasted the whole bowl. Same goes for their HK style Wanton Soup, tasted like salt and scallions hastily thrown into hot water (you know how some lazy chicken rice vendors does it? That's the taste). The wantons were delicious though, substantial fillings with a thin skin, so all is not lost. 
Before anyone skins me alive, I have to say I am surprised by the dramatic presentation of their desserts - on a bowl of "dry ice" (or liquid nitrogen if you will). The Cream of Avocado with Walnut Ice Cream took me by surprise and left me yearning for more. Strangely, it tasted like Cream of Durian instead but I couldn't care less because it is soooo comforting. This is one dish I wished I had more of. *sighs and reminisce the taste* 
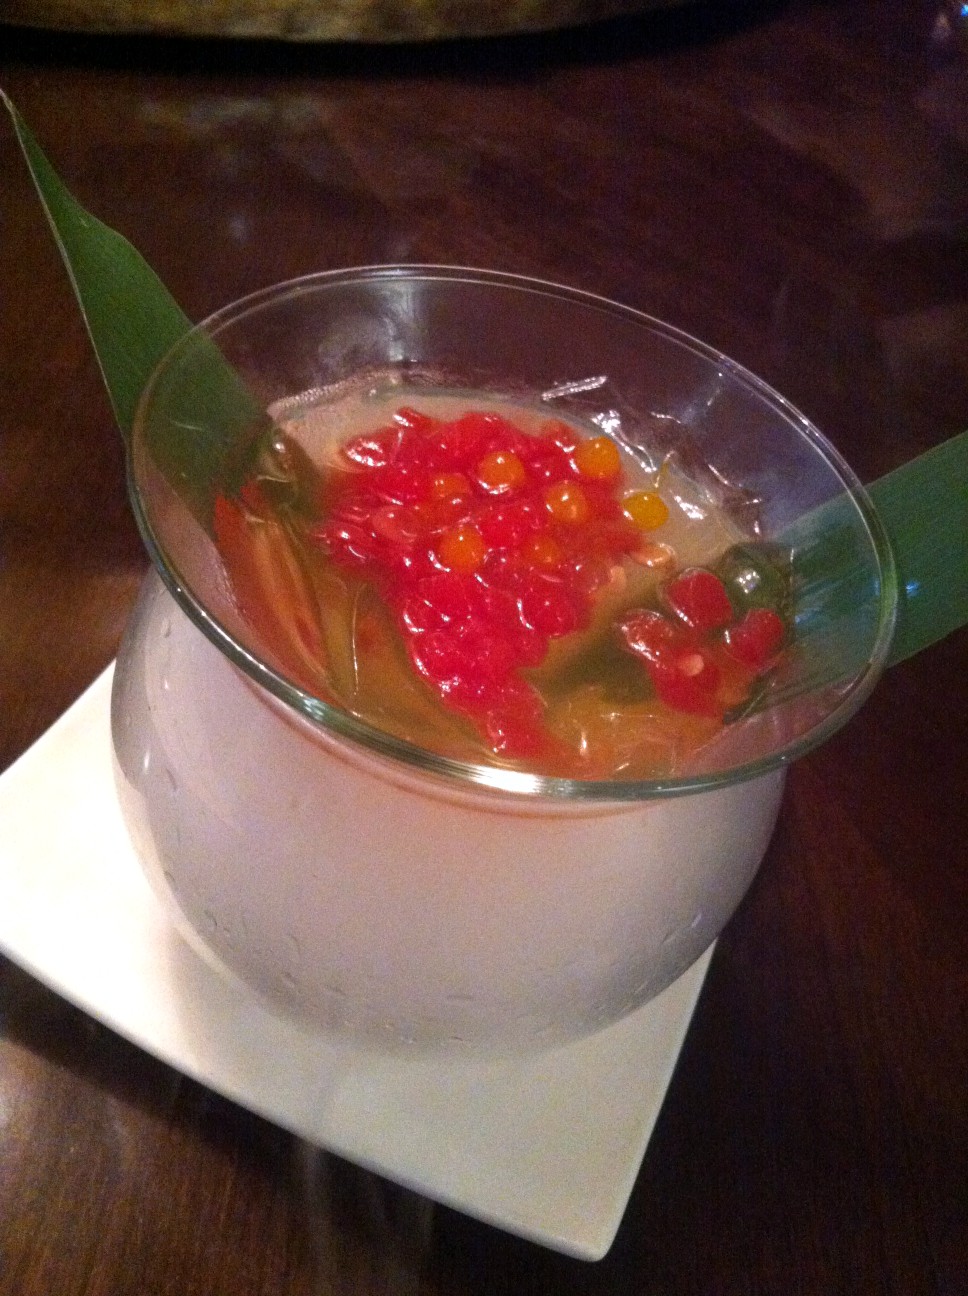
Another dessert - Watermelon Chutney with Aloe Vera, Crystal Pears and Refreshing Lemongrass Jelly (that's quite a mouthful =x) gave me an "foodgasm" that went away as sudden as it came. As the server carried the desserts into our private room, I yelped in excitement. "OMG! They did spherification with watermelon puree!!!" while rubbing my hands gleefully, imaging the texture of caviar popping in my mouth yet releasing sweet and refreshing watermelon juice. I popped a mouthful and my adrenaline rush went away. They were Tadpole Jellies......... (-.-)Zzz

Conclusion: High class Chinese restaurant with a modern look inspired by traditional Chinese features and decorations. The servers are attentive enough (initially keep forgetting to refill our teas though, maybe 'cause we were in the private room), tactful (to provide a set of baby utensils for my nephew), knows their dishes well and very very proficient in both English and Mandarin. It is the ideal place for a business lunch or dinner, it would also be the best place to introduce dim sums to any expat friends though you'll have to let them know they are not exactly the most traditional renditions.

On a personal note, this place misses more than it hits. For $48++, would I patronize again? Probably not (but yes if I'm not the one paying =P). But I might come back just for its Kurobuta Char Siew and Cream of Avocado. Comparatively, I can stuff myself to death with mainly good dim sums at Wah Lok's for approximately $25 ala carte. And stuff my face with Bo Lo buns and Egg Tarts which are missing from the offering here. If you are an avid fan of Cherry Garden and know which dishes I should have try and which will change my perception, do let me know and I will pay them another visit.

Although the dim sum was mediocre, I didn't complain since I didn't foot the bill (else I would have asked for the chef. I'd imagine myself doing it when the soup were served). My brother and sister-in-law treated us since it was a double celebration - Father's Day and my MiL's birthday. Heehee.. Thank you!
Totally unrelated but it is also the first time I made a full cake from scratch. Although amateurish, I thought it is pretty good for an untrained self taught baker. It was a self-created recipe - Soy Milk Cake with Lychee creme which both the birthday girl and I enjoyed a lot.
DISCLAIMER: The blog and me are not affiliated to any constituencies of any sort. This post is set up to share thoughts/conclusions/reviews on various topics, such as food, products and restaurants. I have, by no means, any intention of flaming, defaming, accusing and insulting any individual/establishment. No benefits in any form, monetary or otherwise, was exchanged for the post. The writing is not influenced by any parties, and is based solely on my personal thoughts, preference, observations and biasity, if you will. Take it with a pinch of salt.

All blog posts and photos are properties of WhatToBakeToday (unless otherwise stated). Unauthorized use and/or duplication of these contents, whole or part thereof, without express or written permission from this blog's author is strictly prohibited. Excerpts and links may be used, provided that full and clear credit is given to WhatToBakeToday with appropriate and specific direction to the original content. 

Steamed Egg Cake (鸡蛋糕)

Before you read further, if you're looking for Kuih Bahulu, you're in the wrong place. =) This post is about the traditional Chinese version of steamed egg cake that many of us have fond childhood memories of. Ahhh...

Still not sure? This is how it looks like.
I have to say, this is one of the things that are so simple to make but so easy to get wrong. I tried 3 times, tweaking the recipe each time, before finally getting both the flavour and texture right. And that's not before utilizing the foam method for this supposedly traditional Chinese snack. See the following for failed examples. Hahaha...

First attempt - Actual colour is lighter since I used a "retro" lens for photo but the cake was dense and heavy, tasted like... shhhi.. not good eats. =(

Second attempt - Taste started to resemble 鸡蛋糕 but something was missing. While top of the cake rose, the bottom half remained hard and dense.

Third attempt - Finally got the taste! Cake is fluffy enough although aesthetically different from the traditional one since it didn't puff up. But boy I was glad I finally got both taste and texture right.

Fourth attempt - Got everything right after using the foam method. (YAY! ^_^) But the stupid water droplets disfigured my pretty 鸡蛋糕's face. At least it puffed up and the whole cake was demolished within a short while. Haha..


Today is the fifth time I made 鸡蛋糕. I had a sudden uncontrollable urge to eat some after sharing my recipe with friends on FB. *wink wink* I quickly marched out to get some soda and made these simply delish eggy cakes while my 卤肉 stewed away.

Steamed Egg Cake (鸡蛋糕)
Makes a 8" cake tin or 12-14 regular muffin cups

230g     Cake Flour, sieve 2-3 times
180g     White Sugar
    4       Eggs, yolks and white separated
  90g     Ice Cream Soda / Sprite / 7-Up (I prefer Ice Cream Soda)
1 tsp     Vanilla Extract


1. Whisk egg Yolks, Sugar & Vanilla Extract on high speed till ribbon stage. It should doubled/tripled in size, took me about 5 minutes. Transfer the mixture to a mixing bowl, clean your mixer.

2. Fold in Flour in 3 additions, alternating with the Soda, waiting for each to be well incorporated. Ie. Flour -> Soda -> Flour -> Soda -> Flour. The batter should be smooth and lump-free. 

3. Using the whisk attachment, whip Egg Whites on high speed till stiff peak. Adding a tiny bit of Cream of Tartar or Powdered (aka Icing/Confectioners') sugar will help with the structure. Some might prefer cornstarch instead, not common though.

4. Introduce a small portion of the whipped egg whites by a gentle stirring motion; this will help lighten the batter. Fold in the remaining whites in 3 portions. It's ok if it's not fully incorporated, it will work out later when steaming but DON'T over fold else it's not gonna rise. 
5. Pour mixture into 8" cake tin, lined with parchment paper. Or line your muffin tray with your favorite liners and fill each cup 3/4 of the way. Steam over roaring boiling water for 20-30 minutes. 15-20 minutes is suffice for the individual portions. Whichever size, check cake at 15 minutes and decide. Cake tester or skewer should come out clean when inserted into the middle of the cake. Remember to wrap a piece of cloth over the wok lid so water droplets can't get to your nice nice 鸡蛋糕. =)
Optional: You can make colourful 鸡蛋糕 by adding a drop of food (gel) colouring after folding in the whites. Be warn it will flatten the batter slightly due to additional stirring from getting a homogeneous colour (or if you're not lazy like me, you can add the colouring before folding in the whites). And if you want your cakes to "smile" at you, sprinkle sugar in a cross (X) pattern across the batter or cross (X) the surface of the batter with a slightly oiled knife before steaming and they will split right up.

If you run out of muffin/cupcake trays, don't be a smart alec like me and line a ramekin instead. The (blue) cake couldn't expand nor rise properly, resulting in a dense center. =( Pink and yellow ones are good eats though. Another lesson learned. =D


All blog posts and photos are properties of WhatToBakeToday (unless otherwise stated). Unauthorized use and/or duplication of these contents, whole or part thereof, without express or written permission from this blog's author is strictly prohibited. Excerpts and links may be used, provided that full and clear credit is given to WhatToBakeToday with appropriate and specific direction to the original content. 

Spicy Dried Shrimp Rolls (Hae Bee Hiam Rolls)

Spicy Dried Shrimp Rolls (Hae Bee Hiam Rolls), an indispensable Chinese New Year snack, are essentially deep fried mini spring rolls with a spicy dried shrimp filling. Nothing fanciful. I don't know if it's the crunchiness, the spiciness or simply because they're so handy, Singaporeans just can't do without these little babies during CNY.

I made these about 2 weeks ago when I made a batch of Spicy Dried Shrimps. Then I caught a bad flu which crippled my blogging routine and rendered me useless.

The ingredients required are really simple. It's the rolling that makes them labour-intensive and attributes to the high price. 

Spicy Dried Shrimp Rolls (makes about 40 mini rolls)
   5       Spring Roll Skin, each cut into 9 squares
   1       Egg, lightly beaten 
1. Place a small amount of Spicy Dried Shrimps in the center of a small spring roll skin. Fold the bottom -> right -> left corners toward the center. Dab a little egg wash in the middle and the last corner before completing the roll.
2. Deep fry in Medium heat oil till golden brown OR "fry" them in an Air Fryer at 180º C for 10 minutes, checking and shaking the basket halfway. 

That's it! It's done. I've forgotten to take a picture of the completed dish. Hahaha... If you decided to make any, remember to take a picture and share it with me. =) Have fun rolling!!


All blog posts and photos are properties of WhatToBakeToday (unless otherwise stated). Unauthorized use and/or duplication of these contents, whole or part thereof, without express or written permission from this blog's author is strictly prohibited. Excerpts and links may be used, provided that full and clear credit is given to WhatToBakeToday with appropriate and specific direction to the original content. 

Wah Lok Cantonese Restaurant

The past week hasn't been exactly smooth-sailing as I came down with a bad flu. Since I wasn't in the pinkest of my health, there was a slight pause in posting. Of course, the darn flu isn't an excuse to take a break from posting, but the inability to utilize my cerebrum and the inability to stabilize my motor skills, irritated the hell outta me. You know how flu medicine makes people groggy, drowsy, stalls (if not halt) your brain and you just want to lie in bed all day. Hahaha..

Since this is the first post after a week's break, let me warm up by doing a review on one of my favourite haunt for dim sum.

Wah Lok Cantonese Restaurant
2nd Floor,
76 Bras Basah Rd, Carlton Hotel,
Singapore 189558
Call for reservations: 6311 8188

Carlton Hotel is at the junction of Bras Basah Road and Victoria Street, opposite SMU and CHIJMES. Complimentary car park coupons are available. Do request from them if they didn't offer any. Their service standard varies from average to bad, depending on which server you get. Their main dining area has pretty strong air-conditioning; it can get real chilly so do bring a jacket along. And to mimic the traditional "yum cha" experience, they have a couple of (usually) mid-age ladies pushing a cart, peddling its contents which are mostly fried fritters. But *sighs* since I'm also having a sore throat and bad cough, no fried food for me. =(
I almost always start the meal with their 菠萝包 (Bo Lo Bun), my personal favourite from Wah Lok. In fact I should call it 叉烧(Char Siew)菠萝包 since the traditional one is empty while this is stuffed with well-marinated, sweet char siew (I'm not sure what they call it on the menu though =P)! The char siew is encased in a thin wall of soft bread which has a sweet crust atop that resembles a cookie. There is an interesting contrast between the crunchy crust, the soft bread and the "meaty" char siew. Perhaps what's really in the limelight is the moist char siew filling which helps bring back the otherwise dry pastry to a balance. IF I have to complain about something (I'm fine with the way it is =P), I would say that the taste is one dimensional, this pastry is just sweet bread + sweet filling + sweet crust, sweet all around but in different degree (filling is the sweetest). To make things even more interesting that it already is, perhaps can consider making the filling slightly salty? Heehee.. 
Since we're having dim sum, how can we not have 叉烧包 (Char Siew Bun) right? Hahaha.. I think the filling should be the same of Char Siew Bo Lo Bun so the standard is equally high. I have had the moment of being torn apart between this and Bo Lo Bun, unable to decide which is my favourite. Well, you know which won and it's due to the contrast in texture. 
蛋挞 (Egg Tart) is another essential in HK dim sum. Wah Lok's features an uniformly puffed puff pastry instead of shortcrust pastry. Both are traditional but I say puff pastry is way more difficult to produce. (Thanks to cousin for being my hand model. Hahaha)
Like me, many people wouldn't be able to resist the urge of ordering a bowl of 皮蛋粥 (Century Egg Porridge) for brunch. I hate to say this, but even with the dual egg combination (century and salted), I didn't find their porridge exceptional, would have probably given it a pass if not for the fact that I'm still feeling under the weather.
Ahhhhhh.... 烧肉 (Chinese Roasted Pork, mostly just known as Roasted Meat), as weird and unusual it is to have it as a dim sum item, please do not miss it under any condition. It will rewrite your perception of how roasted meat should be (it rewrote mine =X). Roasted meat was never my preferred protein, it is always either too salty, too fat, too dry, too hard (the top skin), too tough or too something! I always found something wrong with the piece of roasted meat I'm chewing on. That is until I ate Wah Lok's offering...... I think I shouldn't describe how this taste like and let you experience on your own. This is more than just a nicely presented dish.
In case you're looking for 虾饺 (Prawn Dumpling aka Har Gau),  烧卖 (Pork Dumping aka Siu Mai) and 猪肠粉 (Rice Noodle Rolls aka Chee Cheong Fun), here they are. They are delicious and made with fresh ingredients but I didn't see any "wow" factors to rave about.
However, to be fair, I did not sample the Siu Mai (fingers not fast enough =P) but didn't remember anything significant from the many other times we had it. Likewise to the Cheong Fun, do note that it can be filled with char siew too but we figured, we have had too much char siew already.
If you grew up in a west-centric environment and you're reading this post because you're travelling to Singapore soon, this next dim sum might come across as unhygienic, uncouth and totally disgusting - 凤爪 (Chicken Feet). If you manage to cast its image aside and muster enough courage to put a feet in your mouth, I promise you will be greeted with soft gelatinous skin, tendons and tissues that fall off the bone so easily, all you need to do is to suck on them. Not forgetting to mention that chicken feet is packed with the elusive collagen which is supposedly good for making our skin supple (sadly, the latter's not true). I say Wah Lok's 凤爪 is one of the top few in Singapore and if you were to suck on a feet, this will be the place. =P

Conclusion: We have been satisfying our dim sum cravings at Wah Lok for quite sometime (2-3 years now?). Although their service can be quite bad at times, we're glad that the chefs maintain the food's high standards. If you prefer to be away from the traffic, away from the heat and don't mind paying a little more for dim sums, Wah Lok Cantonese Restaurant is the perfect place. Prepare SGD20 - SGD40 (if you're a big eater) per person. Do note that they have 2 rounds of service and the first ends at 1pm.
DISCLAIMER: The blog and me are not affiliated to any constituencies of any sort. This post is set up to share thoughts/conclusions/reviews on various topics, such as food, products and restaurants. I have, by no means, any intention of flaming, defaming, accusing and insulting any individual/establishment. No benefits in any form, monetary or otherwise, was exchanged for the post. The writing is not influenced by any parties, and is based solely on my personal thoughts, preference, observations and biasity, if you will. Take it with a pinch of salt.

All blog posts and photos are properties of WhatToBakeToday (unless otherwise stated). Unauthorized use and/or duplication of these contents, whole or part thereof, without express or written permission from this blog's author is strictly prohibited. Excerpts and links may be used, provided that full and clear credit is given to WhatToBakeToday with appropriate and specific direction to the original content. 

Spicy Dried Shrimp (aka Hae Bee Hiam)

I'm still messed up by the flu with the fever torching my eyes and baking my bones. I didn't cook/bake today but I still have many food items I haven't manage to post, so I've decided to do a short post on an extremely useful necessity.

Spicy Dried Shrimp, commonly known as "Hae Bee Hiam" (loosely translated to Shrimp Rice Spicy) amongst the locals, is one condiment many households cannot do without. It is what is inside those tiny, insatiable Spicy Dried Shrimp Rolls that once you start, you can't stop until you end up with a sore throat. I always add a spoonful to my fried rice/noodles for an extra spicy, flavorful kick. They will get you to down another bowl of rice on its own or like me, I just eat them with bread!

There isn't a lot of ingredients involved but the process is slightly torturous and tedious. Therefore, I suggest doubling or even tripling the recipe to prepare a large batch for storage.
Spicy Dried Shrimp
(Please credit if you've enjoyed it. Thank you!) 

200g     Dried Shrimp (weight is before soaking)
   20g     Garlic, minced (about 5-6 cloves)
 200g     Sambal
Salt & Sugar to taste

Doesn't matter if the sambal is home made or store bought although there's always greater control in home made items.

1. Soak the Dried Shrimps for about 20-30 minutes, dry the shrimps as much as you can and have it coarsely minced for chunky style so you will get the occasional burst of shrimpy goodness when eating.
2.  Heat a tablespoon of oil over Medium heat and sautéed garlic till fragrant. Add in the minced shrimp and continue frying till the whole kitchen is filled with the aroma of fried shrimp. The minced shrimp will shrivel slightly and darken in colour. Another tell-tale sign is that some of the smaller pieces will start jumping about the wok.

3. Add in the Sambal, mix with the minced shrimp and keep the mixture moving constantly to prevent burning (I burnt mine a little as I tried to take pictures... -.-). Season to taste. Like every other time, the chilli will assault your eyes and nose. Keep your kitchen well-ventilated at this stage. Heat off when most moisture has been removed.

4. Cool completely before storing in a sterilized container. Or serve immediately with a bowl of porridge!


All blog posts and photos are properties of WhatToBakeToday (unless otherwise stated). Unauthorized use and/or duplication of these contents, whole or part thereof, without express or written permission from this blog's author is strictly prohibited. Excerpts and links may be used, provided that full and clear credit is given to WhatToBakeToday with appropriate and specific direction to the original content. 

Singapore-Style Curry Samosa

While on the subject of turnover pastry in the post on Curry Pok, I was surprised to find out that Samosa is considered a turnover pastry as well. There's a dozen different names referring to the same crispy, delicious, deep-fried (sometimes baked) snack that people across India, Asia and Africa love. They do look a little different in some countries, like a pyramid, rather than the flat triangular pastry we are familiar with. They are also made with different fillings and dough across the different regions.

In Singapore, most of us make them with Spring Roll skin and stuff them with curried potatoes. The skin is so innocently thin, light and crisp unlike Curry Pok which are pretty filling, making it a "dangerous" snack to munch non-stop on! You will almost always find me gorging on them whenever offered in a buffet. Hahaha..

Since the filling is the same as Curry Pok, I always make extra so I have an "excuse" to make Samosa with the "leftovers". Heehee!! Check out the post on Curry Pok for the filling's recipe.

*Apologies for today's short post, my brain's getting fried from a fever and I'm gonna go to bed soon =)

Samosa
Spring Roll Skin
Egg Wash

1. Cut Spring Roll skin into half and "stick" one of their ends together using the egg wash, to create a long piece of skin. Scoop a tablespoonful of filling near to the edge and bring one corner to the top, creating a triangle and covering the filling at the same time. Continue folding the pastry up and down, maintaining the triangular shape.
2. Egg wash the last part of the skin so that it will stick on itself. And brush some on the flat triangular surface. 


 3. Deep fry them over Medium heat till golden brown. Or bake them for about 20 minutes at 200º C. Or if you have an air fryer, "fry" them at 180º C for 10 minutes, open and shake the basket before continuing for another 10 minutes.


All blog posts and photos are properties of WhatToBakeToday (unless otherwise stated). Unauthorized use and/or duplication of these contents, whole or part thereof, without express or written permission from this blog's author is strictly prohibited. Excerpts and links may be used, provided that full and clear credit is given to WhatToBakeToday with appropriate and specific direction to the original content.