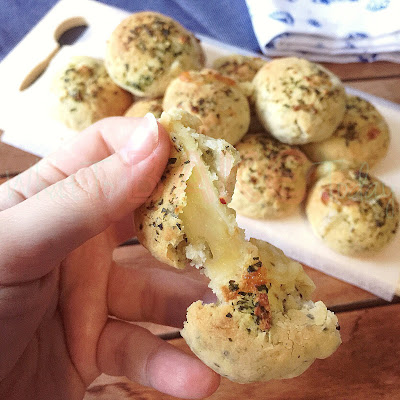
Garlic Herb Cheese Bombs

Although I'm already a month into my 3rd trimester and I really shouldn't be tinkering in the kitchen, but I just can't help it! My brain wouldn't stop thinking about food, no matter making or eating (or making so I can eat them). This is one of those that I couldn't get out of my mind for days, so I told myself, this will be the last time... again. 😅 The lies I keep telling myself. 
These Garlic Herb Cheese Bombs are the perfect morsels of buttery, garlicky goodness, each bursting with melty cheese! Awesome as appetisers, snacks or like me, eat a lot more as a light meal. If you already love having cheese on garlic bread, you will love these cheese-filled, tender, garlic butter biscuits even more! A must-try recipe for you!

Garlic Herb Cheese Bombs (makes 24 bite-sized snacks)

240g     Plain flour
  15g     Sugar
    5g     Garlic powder
    5g     Dried Italian herbs
    2g     Salt
    1g     Pepper
  10g     Baking powder

  80g     Butter, cold, unsalted
175g     Buttermilk, cold (adjust more or less accordingly)

240g     Mozzarella cheese, cut into 24pcs

To brush on
  50g     Butter, melted, unsalted
  10g     Garlic, minced
    5g     Parsley, chopped
    1g     Salt

Preheat oven to 200°C
1. Mix evenly the flour, sugar, garlic powder, Italian herbs, baking powder and salt. Add in the butter, then using a knife/fork/pastry cutter to cut it through the flour mixture till it resembles breadcrumbs.
2. With a fork or spatula, slowly stir in the buttermilk, bit by bit, and mix till the dough just comes together. You may require more or less than the stated amount. Then briefly knead the dough with your hand (just under 10 kneads) till it no longer sticks to the side of the bowl . Cling wrap and rest dough in fridge for at least 20 mins.
3. On a lightly floured surface, roll the chilled dough out to a rectangular shape, approximately 5 mm thick and cut the dough into 24 pieces.
4. Wrap a piece of mozzarella cheese in each piece of dough, making sure that all the edges are sealed well. Roll them into a ball before placing on a lined baking sheet. 
5. Melt butter in microwave and add to the minced garlic, chopped parsley and salt. Gently brush on the garlic butter mixture onto the cheese bombs. Bake 15-17 mins till golden brown.
6. Remove the cheese bombs from the oven, let cool slightly and serve immediately.

If you like this recipe and would like to share it, please link to this blog post with its original contents. All recipes are created by me (unless otherwise stated) and require a lot of effort and time to craft. Crediting back is the biggest form of encouragement for me! Thank you! =)


Thoughts: Unlike my recent recipe shares, these Garlic Herb Cheese Bombs do require some time to make. But even at my current snail-slow speed and pregger's brain, frequently scrambling around for ingredients, I did manage to finish under 2 hours with a 30 mins rest time. It should be much faster for you guys. However, if you have access to ready-to-use biscuit dough, it should dramatically shorten the required time to roughly an hour. It will not taste the same though, without the garlic powder and dried herbs in the dough, but it will be easy and fuss-free.

I still prefer to make the dough from scratch and if you want to save some time, I highly recommend doing this. Blitz the flour mixture and cold butter using a food processor instead of doing it manually. Not only will it be easier and quicker, the butter also gets cut up more finely, gets mixed more evenly and remains cold. These factors will contribute to a tender bake. Seriously, I would have used a food processor if not for the fact that I hate washing them. 😝
As for the buttermilk, I would advise not adding all at once. I started with 150g and drizzle in 1 teaspoonful each time till it reaches the consistency I'm after. In the end, I used 165g for this particular bake. If the dough becomes too wet and tacky; more flour has to be added just so it can be handled properly, the resulting bake will be tough with tight crumbs. It's one lesson I learned the hard way through my past failures.

There are 2 minor changes I would make for the next bake though. I might increase the amount of salt in the dough, swap Mozzarella for Cheddar or grate some Parmesan on top of the bombs before baking. While I find the bombs a little under-seasoned, the rest of the family thinks it's all good. I don't know, it could be me tasting differently due to hormonal change but I would still like to try those changes. The other thing would be to separate the chopped parsley in the garlic butter mixture and have them sprinkled on only towards the end of the baking time. Applying them from the start dries out the fresh parsley too much, making them lose its fragrance and colour. Not really a big deal, I just thought they look pretty awful on the photos so I can improve them the next time or rather, *ahem* have excuses to make more! 
But one thing for sure is that calling these "cheese bombs" are not at all exaggerating. Just look at that cheese go!

Try these cheessssey bombs, with or without my proposed changes, and share with us your yummy creations and thoughts on facebook or tag @whattobaketoday on instagram!


All blog posts and photos are properties of WhatToBakeToday (unless otherwise stated). Unauthorized use and/or duplication of these contents, whole or part thereof, without express or written permission from this blog's author is strictly prohibited. Excerpts and links may be used, provided that full and clear credit is given to WhatToBakeToday with appropriate and specific direction to the original content. 

Crispy Oven-baked Chicken Wings

Who doesn't love deep fried chicken wings? Not me. I can eat them everyday if given a choice. But let's be honest... Deep fried food are not healthy and they should only be an occasional indulgence. Especially now, when I'm expecting, I find that a healthy diet is exceptionally important to one's overall well-being. 

Since the thing we love most about deep fried chicken wings is the skin, I sought out the best way to crisp up chicken wings in an oven!
Crispy Oven-baked Chicken Wings 

12 pcs    Chicken Wings
 2 tsp     Baking powder
 1 tsp     Salt 
 2 tsp     Rice flour
Pepper to taste

1. Pat dry the chicken wings. Mix all the dry ingredients together then add them to the chicken wings, try to coat them as evenly as possible and the best way to do so is with our hands.

2. Lay the chicken wings on a wired rack and place in fridge, uncovered, for at least 1 hour.

Preheat oven to 120°C
3. Place the wired rack with the chicken wings on a lined baking sheet, and bake for 30 mins. 

4. Increase oven temperature to 220°C and bake for a further 30-40 mins, turning halfway through, till they are golden brown and crispy.

5. Remove chicken wings and if you can resist, let cool slightly before serving.

If you like this recipe and would like to share it, please link to this blog post with its original contents. All recipes are created by me (unless otherwise stated) and require a lot of effort and time to craft. Crediting back is the biggest form of encouragement for me! Thank you! =)


Thoughts: In a nutshell, this recipe works by drying out the moisture in the chicken wing's skin. Baking powder raises the pH level of the chicken which in turn breaks down the protein chain of the skin and allows it to crisp more than it usually does. And as most of you already know, adding rice flour to the mix will help with the crisping too. But most importantly is the step of drying out the chicken wings in the fridge. Water and oil are not friends! 

I have purposefully left this recipe as a basic one, only to be seasoned with salt and pepper. Because any seasoning, herbs or dry rub can be added, be as creative as you want! For this particular batch, I've only added a pinch of chili and garlic powder, and they were already super duper tasty. Can you believe both of us polished off all 12 chicken wings?! 😆

This is amazing for a unbattered chicken wing but I'm not going to lie, it pales in comparison to a deep fried and battered one. Whether it is fair to make such comparison? I'll leave that to you. Just note that like most deep fried food, these will lose its crispiness when it gets cold.
Otherwise, just listen to that crispy skin! It's like some beautiful food music to my ears. Simply irresistible! I'm quite happy to chomp on these every other week until I come up with some other alternatives.

Till then, share with us your crispy creations on facebook or tag @whattobaketoday on instagram


All blog posts and photos are properties of WhatToBakeToday (unless otherwise stated). Unauthorized use and/or duplication of these contents, whole or part thereof, without express or written permission from this blog's author is strictly prohibited. Excerpts and links may be used, provided that full and clear credit is given to WhatToBakeToday with appropriate and specific direction to the original content. 

Lemon Garlic Salmon en Papillote

These days, as my tummy grows bigger, it's getting more and more tiring if I stay in the kitchen for too long. That's why it is an absolute blessing to have dinner prepped and cooked in under 20 mins.
Lemon Garlic Salmon en Papillote (serves 2)

2 pieces of Salmon Fillets, about 200g each
  20g    Garlic, sliced
    1      Lemon, sliced
    5g    Olive oil
salt and pepper to taste zest of 1 lemon
lemon wedges to serve

Optional: vegetables to include
Asparagus

Green beans
Cherry tomatoes, halved
Carrots, thinly sliced
Zucchini, thinly sliced
Bell peppers, julienned
Onions, sliced

Preheat oven to 220°C
1. Toss the vegetables that you're using in some olive oil, salt and pepper. 

2. Season the salmon fillets with salt and pepper.

3. Tear off 4 pieces of parchment paper, big enough to cover and wrap each piece of salmon fillet.
4. Take 1 piece of parchment paper and place 1/2 of the vegetables in the middle of the paper. Then place a few lemon and garlic slices on top of the vegetables before topping with a piece of the salmon fillet. Add a few more garlic slices on top of the fish and sprinkle with some lemon zest.
5. Cover the fish and vegetables with another piece of parchment paper. Then tightly crimp in the edges of both pieces of paper to seal the pouch. Repeat for the other pouch.

6. Transfer the pouches onto a baking tray and bake for 10-12 mins. Carefully cut open the pouches, they should be slightly puffed from the trapped steam. Serve immediately with a wedge of lemon.

If you like this recipe and would like to share it, please link to this blog post with its original contents. All recipes are created by me (unless otherwise stated) and require a lot of effort and time to craft. Crediting back is the biggest form of encouragement for me! Thank you! =)


Thoughts: "En Papillote" is just a fancy French term for "in parchment". It involves cooking food, usually fish and vegetables, using steam trapped in a pouch folded from parchment paper and/or aluminium foil. It's a very simple cooking technique, but one no less exciting as the pouch is usually cut open in front of guests, allowing the steam and aroma to escape at the table, providing a little sensory experience.

20 mins from prep to dinner. Hands down one of the simplest and fastest recipe till date. You can substitute salmon with other fish but I like salmon and they're packed full of omega 3-fatty acids that's good for our heart and brain. Especially for pregnant ladies since salmon is touted for helping with baby's brain development. 

To make this a complete meal, consider adding some of the suggested vegetables and cook everything together. That's the whole point of a quick recipe isn't it? 😜 You can use other vegetables too but those that require a longer time to cook (e.g. carrots, potatoes) should be sliced very thinly so that it finishes the same time as the fish.

Share with us your yummy creations on facebook or tag @whattobaketoday on instagram!


All blog posts and photos are properties of WhatToBakeToday (unless otherwise stated). Unauthorized use and/or duplication of these contents, whole or part thereof, without express or written permission from this blog's author is strictly prohibited. Excerpts and links may be used, provided that full and clear credit is given to WhatToBakeToday with appropriate and specific direction to the original content. 

One Pot Sambal Belacan Sweet Potato Mac and Cheese

As most parts of the world enters Autumn and pumpkin-related food becomes ubiquitous, I've decided to take on one of America's favourite fall comfort food, the pumpkin mac and cheese, and give it a familiar local spin. 
One Pot Sambal Belacan Sweet Potato Mac and Cheese (serves 3-5)

  15g     Garlic, minced
  10g     Shallot, minced
  20g     Dried shrimps, soaked and coarsely diced
160g     Sambal belacan, homemade or store-bought

750g     Milk
500g     Water, more if needed
250g     Dried pasta

350g     Sweet potato puree
250g     Sharp cheddar, shredded
200g     Kangkong (water spinach), washed and trimmed
   1       Red chili, cut into rings

 3-5      Calamansi

1. In a pot or frying pan, heat a tablespoon of oil over medium heat and sauté the garlic, shallot, dried shrimps till fragrant. Mix in the sambal belacan and fry till mixture is slightly drier.

2. Stir in the milk, water and half of the sweet potato puree before adding the dried pasta. Cover pan to bring mixture to a boil, stirring frequently for about 8-10mins, adding more water if needed.

3. When the pasta is barely al dente or just before your preferred texture, stir in the remaining sweet potato puree till mixture is homogeneous. 
4. Add in the kangkong and red chili. Cover for another 3-4mins till pasta is al dente or at your preferred texture and the kangkong has softened. 
5. Add in the sharp cheddar and stir till cheese has melted. Season accordingly with salt if needed. Serve immediately with calamansi.

If you like this recipe and would like to share it, please link to this blog post with its original contents. All recipes are created by me (unless otherwise stated) and require a lot of effort and time to craft. Crediting back is the biggest form of encouragement for me! Thank you! =)


Thoughts: This is one Southeast Asia flavour-influenced, fusion American dish that works really well. Sambal belacan balanced the overall taste profile beautifully with its slight spicy kick and savoury, umami touch. To further amp up the umaminess, I've included additional dried shrimps which you can adjust depending on how "shrimpy" you like. For me, I really enjoyed biting into the little nuggets of concentrated shrimp flavour, so I will definitely double the amount next time. 
While creating the recipe, including kangkong was a no-brainer since it is a match made in heaven with sambal belacan as with the popular local dish 马来风光 (stir fry kangkong with sambal belacan). The crunchy vegetable also provides a textural contrast to the otherwise soft pasta dish.

As my tummy grows bigger each day, it is becoming increasingly challenging to remain standing for too long. Hence, I've created this dish as a "one-pot" recipe to save time and hassle. And luckily, I have access to off-the-shelves, sambal belacan paste this time. They are particularly handy during this period or for whenever I run out of homemade sambal belacan and am too lazy to make more. 
😝
Sooo... If I can make this dish without breaking a sweat, so can you! Try this dish and share with us your yummy creations on facebook or tag @whattobaketoday on instagram


All blog posts and photos are properties of WhatToBakeToday (unless otherwise stated). Unauthorized use and/or duplication of these contents, whole or part thereof, without express or written permission from this blog's author is strictly prohibited. Excerpts and links may be used, provided that full and clear credit is given to WhatToBakeToday with appropriate and specific direction to the original content. 

Laksa Sablés

There was a period of time, about 5 years ago, when my sil and me were obsessed with making sablés. Thankfully our families were also totally in love with them. The buttery goodness, the crumbly, sand-like texture; we couldn't get enough of it. These delicate, French butter cookies were delicious plain, but it wasn't long before we started experimenting with different flavours. Out of which, our favourite are the Matcha sablés and French Earl Grey sablés.
Since I've always love sweet and savoury combinations, I started dabbling with various, "weird and quirky" flavours. Hae bee hiam (spicy dried shrimp) sablé was one of them, created for Chinese New Year back then. I thought it tastes unique and funky in a good way, but it received mixed reviews from families and friends. Thereafter, I wanted to make laksa-flavoured ones, way before Cookie Museum came up with theirs, but I'm always too lazy to prepare the laksa paste from scratch. So you know... eventually I dismissed the idea.

That's how when I finally got the chance to work with premix laksa paste, Laksa Sablé was the first thing that popped into my mind!

Laksa Sablés (makes about 60-70 5cm fluted rounds)

250g     Butter, unsalted
200g     Icing sugar
100g     Premix Laksa Paste
     1     Egg
500g     Plain flour
  50g     Dried shrimp, blitzed
    7g     Chopped Laksa leaves

Optional
     1     Egg
1 tbsp   Water
small handful of Sakura Ebi

Preheat oven to 175°C

1. Using a paddle attachment, cream butter and icing sugar till mixture is soft and creamy.

2. Add in the premix laksa paste, mix till combine before adding the egg and mix till mixture is homogeneous.

3. Stir the blitzed dried shrimp and chopped laksa leaves through the plain flour and mix evenly.

4. Add the flour mixture to the laksa butter mixture in a few additions and mix till the dough comes together.
5. Wrap the dough with cling wrap and chill in refrigerator for at least 30mins.
6. On a lightly flour surface, roll out dough to a thickness of about 4mm. Using a 5cm fluted round cookie cutter or other desired shapes, punch out dough and lay them on a parchment-lined baking sheet.

Optional
7. Beat together the egg and water to form an egg wash and strain it. Lightly brush the sablés with egg wash and place a few sakura ebi on top.

8. Bake 16-20mins, turning halfway, till sablés has browned slightly. Cool completely on wired rack before storing in airtight container.

If you like this recipe and would like to share it, please link to this blog post with its original contents. All recipes are created by me (unless otherwise stated) and require a lot of effort and time to craft. Crediting back is the biggest form of encouragement for me! Thank you! =)

Thoughts: These sablés tasted really good! It wasn't too huge of a surprise for me since I so love the hae bee hiam sablés back then. The main difference is the lovely aromatics that perfumes the sablés. For that, do choose a good premix and fresh laksa leaves. 

Although there are still some people who finds it weird, u know... laksa flavour in a cookie... a sweet, savoury and spicy cookie... but it works for me, and I simply love it! 
Thanks to our hot and humid climate, I would suggest dividing the dough into a few portions and work with a small amount each time while keeping the remaining chilled. The dough softens pretty fast and this will help keep the dough manageable. Regardless, I still run into the issue of overworking the dough on the subsequent roll outs. I guess this is more or less inevitable if I want to cut out the traditional fluted sablé shape.
My egg wash didn't turn out as pretty as they should be, and the harsh brush marks can be clearly seen in this photo. Perhaps using a non-silicone brush will do the trick next time. Let me know if doing that work out for you guys, otherwise you can leave it out too.

The sablés will last up to a week in an airtight container while the raw dough can keep for as long as 3 months in the freezer.

Try these Laksa sablés and share with us your yummy creations on facebook or tag @whattobaketoday on instagram


All blog posts and photos are properties of WhatToBakeToday (unless otherwise stated). Unauthorized use and/or duplication of these contents, whole or part thereof, without express or written permission from this blog's author is strictly prohibited. Excerpts and links may be used, provided that full and clear credit is given to WhatToBakeToday with appropriate and specific direction to the original content. 

Honey Miso-Glazed Lamb Chop "Lollipops"

Lamb racks are not commonly used in our Southeast Asian, Chinese cuisine and because of this unfamiliarity, many of us might be slightly intimidated by it. The situation is made worse when cooking shows typically portray lamb rack as an atas (expensive, high end) ingredient which is tedious to work with and more than often, a complex recipe to cook it with.
Living in Australia made me realised that lamb racks are actually fairly straightforward to prepare; they can be further portioned into lamb chops to make them even more manageable. Like a good cut of steak, a good lamb chop doesn't require too much effort and are definitely suitable for a casual dining setting like an Aussie backyard barbie. With that in mind, I've put together this Japanese flavours inspired recipe that washes down very nicely with a couple of beers. 
And with these beautiful New Zealand lamb racks from Pure South, things are even easier! The good people at Pure South frenched the racks before vacuum-packing them, saving me the time and hassle of doing it so. And by vacuum-packing, not only does it retains the quality of the free range, grass-fed meat, it is more hygienic and extends the average shelf life significantly with its oxygen-void environment that limits bacterial growth!
Honey Miso-Glazed Lamb Chop "Lollipops"

2 rack of lamb, frenched, portioned and trimmed if desired

Total bone-in, fats on weight= 920g

Marinade

30g     White Miso
50g     Honey
15g     Mirin
15g     Brown Sugar
15g     Vegetable oil
  8g     Ginger, grated, about 1" thumb-sized
10g     Garlic, grated, about 3 medium-sized cloves

Sauce
100g     Water (adjust to preferred consistency)
  15g     Brown Sugar (adjust to taste)

optional:
    5g     Chili powder (adjust to taste)
1. Mix together the ingredients for the marinade and marinate the chops for at least 1 hour. If your chops are thicker than 1", let them come to room temperature before cooking.

2. In a frying pan, over med-high heat, lay the chops, fat side down till fat is rendered and has caramelised (skip this step if fats have been removed). 


3. Then cook each side for about 1-2.5mins depending on the preferred doneness and how thick the chops are


4. Remove the chops from pan. Cover with a piece of aluminium foil and rest for 5mins.


5. While the chops are resting, in the same frying pan, add water, brown sugar and chili powder (if using), adjust to taste accordingly. Bring the mixture to a boil and reduce till it has thicken slightly.


6. Drizzle sauce over lamb chops, garnish with spring onion and sesame seeds and serve.

If you like this recipe and would like to share it, please link to this blog post with its original contents. All recipes are created by me (unless otherwise stated) and require a lot of effort and time to craft. Crediting back is the biggest form of encouragement for me! Thank you! =)

Thoughts: Honey Miso is a combination I put together for a corn on the cob recipe a few months ago. It's sweet and savoury and slightly nutty, a combination that's super easy to fall in love with. When we were eating the corncob with our hands, gnawing on it, licking the sticky sauce off our fingers, it made me want to reach out for a glass of beer. 🍺 So when I was conceptualising a recipe for lamb rack, wanting to create a dish that's easy to cook, with crowd-pleasing flavours and suitable for a casual setting, "Honey Miso" pops up straight away and I knew we had a winner because it's gonna be a beer-friendly dish! 
The sticky, sweet and savoury sauce, holding the lamb chop in one hand with beer in the other, then tearing a huge chunk of meat off with my teeth. There's something primeval about this experience that so satisfy the carnivorous self in me. This, to me, makes a perfect beer food... Okay, maybe throw in a side of fries/chips/frites, I'll never say no to that too. 😁

Compared to mutton, lamb is milder in flavour, especially so for Pure South's stress-free and hormones-free meat; it doesn't have the strong gamey smell and taste which some people find hard to stomach. That's why good quality cuts of lamb are essential to creating a successful lamb dish. Like mentioned earlier, good quality meats doesn't require much effort and will be delicious on their own. That is half the battle won. 
Lamb is a tender piece of meat to work with, hence many chefs recommends serving them medium-rare. That would be my suggestion as well, but knowing our culture, you may chose to cook them all the way through, especially when serving the very young and the elderly. Because even so, they will still remain tender.
Pure South's lamb racks are fairly lean with just a teeny bit of fat which tastes so good after caramelisation. But of course, it can be easily removed for the health-conscious guests. If you're not sure of everyone's preferences, I would suggest doing what I did here, removed the fats for 1 rack and leave it on for the other. Then have them served on different plates, so guests can pick what they want and everyone will be happy!
Beer wise, a fruity pale ale or a lighter lager that's easier on the palate will pair pretty well. Although personally, I'll opt for a dark, malty, almost stout-like ale to balance out the sweetness in the glaze, but my preference has always skew towards dark ale. If any beer enthusiasts try this recipe, do let me know which beer type pairs the best!   
So there we have it. A simple recipe with high-quality lamb chops that requires minimal effort and even less time if they are hitting the barbie. And definitely not forgetting to mention that they washes so well with beer. These meat "lollipops" are bound to be a great hit at your next social gathering, kids and adults alike!

Those in Singapore are a fortunate lot. You can now order directly from puresouth.asia and have them delivered straight to your home! Remember to enter the promo code "FARMFRESH2U" enjoy a 10% discount till 31st July 2017! Also remember to like Pure South's facebook page for more lamb racks recipes. Soon you'll find yourself agreeing with what I've mentioned - tender, no gamey smell and super tasty. 1 rack is simply not enough. Try this dish out and share with us your yummy creations or your favourite beer pairing via facebook, or tag @whattobaketoday on instagram!


This is a compensated post in collaboration with Pure South in return for recipe development and my honest review. All thoughts and opinions expressed herein are my own and are in no way influenced by the company and/or its affiliates. 


All blog posts and photos are properties of WhatToBakeToday (unless otherwise stated). Unauthorized use and/or duplication of these contents, whole or part thereof, without express or written permission from this blog's author is strictly prohibited. Excerpts and links may be used, provided that full and clear credit is given to WhatToBakeToday with appropriate and specific direction to the original content. 

One Pan Creamy Leek, Mushrooms and Chicken Spaghetti

Here's another "one-pan" recipe and have dinner ready in 30mins!

Singaporeans love eating Leek during Chinese New Year. It's Chinese name 大蒜 (da4 suan4) with 蒜 sounding like 算, which means counting; symbolises the counting of money and is considered an auspicious food with its association to good wealth.


While it is not Chinese New Year and we are in fact entering Winter in Australia, it is the season for Leek. Right now, they are the cheapest vegetable in the supermarket, at only A$1.50 each. So Chinese New Year or not, I decided to get one and prepare a fuss-free meal with it.
One Pan Creamy Leek, Mushrooms and Chicken Spaghetti (serves 2-3)

     1      Chicken Breast, sliced

  10g     Onion, minced
  10g     Garlic, minced
200g     Mushrooms, sliced
     1      Leek, leaves and roots removed, sliced

150g     Spaghetti
450g     Heavy cream
150-250g Water
      3     Bay Leaves
Salt and Pepper

Optional

small bunch of fresh parsley, chopped
chili flakes

1. Pat dry the chicken breast slices and season with salt and pepper.

2. In a frying pan/skillet, over medium-high heat, heat 1 tbsp of oil and sear the chicken breast till both sides are browned. Remove from pan and reserved.
3. In the same pan/skillet, saute the minced onion and garlic till fragrant and onion turns slightly translucent.

4. Add in the mushrooms and leek and cook till mushrooms has softened slightly.
5. Stir in the heavy cream, water and bay leaves. Season with salt then add in the spaghetti. 

6. Cover pan to bring mixture to a boil. Then stir frequently for about 5mins, adding more water if needed.
7. Returned the chicken breasts into the pan, nestle them into the spaghetti. Cover and simmer for 5mins.

8. Toss and coat everything with cream sauce, garnish with chopped parsley (if using) and serve.

If you like this recipe and would like to share it, please link to this blog post with its original contents. All recipes are created by me (unless otherwise stated) and require a lot of effort and time to craft. Crediting back is the biggest form of encouragement for me! Thank you! =)

Thoughts: Leek has a mild onion-y taste that some might find it challenging to swallow. But like onion, this pungent taste gets mellowed during cooking and turns into a mild sweetness. This is especially effective when cooked in a cream based sauce like this dish. 

What I love about this dish is that it's creamy and hearty, with vegetables, protein and carbs all in one dish. It hit all the right notes on a cold wintery night. To make it even more awesome, grate some Parmesan cheese over the spaghetti before serving!
Since it only takes 30mins to cook, I didn't have to slog in the kitchen for too long, which is very important because it's Friday night and everyone deserve to chillax, and slump in front of the TV with a drink in your hand! 

If you've tried this dish or other recipes, do share your yummy creations with us on facebook or tag @whattobaketoday on instagram


All blog posts and photos are properties of WhatToBakeToday (unless otherwise stated). Unauthorized use and/or duplication of these contents, whole or part thereof, without express or written permission from this blog's author is strictly prohibited. Excerpts and links may be used, provided that full and clear credit is given to WhatToBakeToday with appropriate and specific direction to the original content.