Pages

Triple Layer Oreo Pumpkin Cheesecake

Comes October, pumpkins become ubiquitous! I'm always tempted to make something out of it during this period, like the Japanese Pumpkin Cake and Maple Pumpkin Custard Tart. Pumpkins are associated with Halloween, Thanksgiving and Christmas in some places, but I realized I only make pumpkin related desserts for Thanksgiving anyway. That's why I really wanted to make some pumpkin desserts for Halloween along side the Bread Monsters, Eyeballs and Spiders, but yeah my October schedule was super busy so it had to wait till Thanksgiving again.
After a short search, I had wanted to attempt chatelaine's pumpkin cheesecake, it looks so decadent! But hubs finally confessed that he's not a fan of very "pumpkin-y" desserts. Alrighty, took you more than a few years to tell me. Hahaha.. So keeping that in mind, I modified her recipe and put together this Triple Layer Oreo Pumpkin Cheesecake instead!
Triple Layer Oreo Pumpkin Cheesecake (makes 9" round)
(modified from chatelaine)

Oreo Crust
   14      Oreos, finely crushed
  15g     Butter, melted

Cake
500g     Cream cheese, room temperature
    4      Yolks
250g     Table Cream (aka cooking cream, coffee cream, light cream)
125g     Sugar
    5g     Vanilla
  45g     All-purpose flour
    3g     Ground Cinnamon
    1g     Ground Ginger
    1g     Ground Nutmeg

200g     Pumpkin Purée

    4      Whites
  50g     Sugar

Oreo Cream
100g     Whipping Cream
  3-5     Oreos, finely crushed (more oreos if you like)

Preheat oven to 160°C

1. In a food processor, process oreos into fine crumbs. Or crush them in a ziplock bag using a rolling pin. Stir in the melted butter, and press mixture firmly onto the bottom of your springform or removable base tin. Bake crust for about 5 minutes, remove and cool on rack.

2. Using a paddle attachment, beat cream cheese and egg yolks until the mixture is smooth and lump-free. Then beat in cream, sugar, vanilla, flour and spices till well-combined.

3. Transfer half of the cheesecake batter into a new bowl and beat in the pumpkin puree.

4. Using a whisk attachment, whisk the whites to soft peaks while adding the sugar gradually. Divide meringue equally between the cheesecake batter and the pumpkin cheesecake batter, fold it in gently for each batter.

5. Pour the pumpkin cheesecake batter over the warm crust, followed by the cheesecake batter and smooth its top. Place in the centre of the oven, with a tray of water set on the bottom of the oven. Bake 1 to 1.5 hours. **Take note this is not water bath

6. Remove cake from oven and immediately run a knife around inside of pan to prevent cracking. Without removing sides, cool completely on wired rack. When cooled, chilled in fridge for at least 3 hours, preferably overnight for best flavour.

7. To decorate, whisk whipping cream till stiff peaks and fold in oreo crumbs. Spread onto chilled cheesecake. Decorate as you wish, or with more oreos.  
Thoughts: If you realized, I had not share any western-style cheesecake before this. It's mainly due to personal preference that I find "too cheesy" cakes repulsive. But I decided to try this recipe, because it uses egg separation method and that I have a surplus of cream cheese at home. Philadelphia is giving away 9" springform pans for FREE when you purchase any 2 philly products. Such a great deal, so why not?! But I don't think the locals are too excited about free stuff, there are still so many left after the promotion ran for 2 weeks! I'm wondering if I should get more cream cheese now that I've found a winner cheesecake recipe. 
However, I didn't get the cake right the first try, took me 3 attempts before I got the right amount of puree so the pumpkin taste is just right (for us at least) and the batter wouldn't be too heavy. Also learned through the hard way that it's still better to place a tray of water in the oven so the locked-in steam will keep the cheesecake moist, same idea as Japanese Cheesecake. It's also important to have all ingredients at room temperature so they incorporate better and easier.
Am really glad that I've decided to give this recipe a go. This cake is light in taste and texture, and I didn't get overwhelmed by the cream cheese. Similarly, having just one layer flavored with pumpkin means it doesn't dominate the whole cake, so hubs enjoyed it thoroughly. And I thought getting the bits of chocolatey goodness from the oreos is an added bonus, simply delightful. This cake is quite delicate, so no matter it's Halloween, Thanksgiving or Christmas feasting, there will always be room for dessert!


All blog posts and photos are properties of WhatToBakeToday (unless otherwise stated). Unauthorized use and/or duplication of these contents, whole or part thereof, without express or written permission from this blog's author is strictly prohibited. Excerpts and links may be used, provided that full and clear credit is given to WhatToBakeToday with appropriate and specific direction to the original content. 

the Smart Waffle by Breville

To be a good baker, you don't necessarily need to have good tools. But to make a good waffle, having a good waffle maker is half the battle won.
So before I feed my waffle cravings, the researcher in me took over, and the search for a good and affordable waffle maker began. It didn't take too long on the internet before I found the mother of all waffle machines -- the Smart Waffle by Breville.
It boasts an all round heating plate, created using thermal technology so waffles cooked evenly and a heated moat that catches batter as it expands. They've even gotten the molecular gastronomy guru, Heston Blumenthal, to endorse it. There was drool all over the keyboard by the time I finished the video. Just one major problem now, this sexy waffle maker costs a whooping A$250! I shutdown my computer and went to munch on bread.

Further attempts to search for cheaper alternatives left me even more frustrated, all that was on my mind is that slick stainless steel body. I was tormented for a month before a major sale came on in a local mall (to the likes of Isetan, Takashimaya). My prayers had been answered, there was a 30% discount on this baby! Still wasn't cheap, but my brain wasn't functioning anymore.

Product Review: What else can I say about the Smart Waffle when Heston Blumenthal is willing to stake his reputation by endorsing it? No, wait, actually I do have some comments.

Heating Element
The heating plate only takes a few minutes to heat up unlike most iron which might take up to 10mins before it is hot enough to produce a half decent waffle. When the machine is ready, it will beep for you and the display screen will turn orange.
Like the advertisement espouses, heat distribution is indeed superb. Every slice of waffle is cooked evenly, every time! Not so much for even browning, but it doesn't bother me as long as the whole thing is cooked through. Some iron creates an ultra crispy outer edge while the center remained limp and 'doughy' (*sigh* you had one job). There is also no down time in between batches, no need to wait for the iron to reheat.

When the timer is up, the machine will beep away for you to retrieve the waffles. No worries if you couldn't get it immediately, the heating plate will adjust the temperature accordingly so your waffles don't get chao tah (burnt), and continues beeping every 30s to remind you of its existence.
Functionality
Speaking of "you had one job", yes, it is a unitasker (or is it?), which waffle maker isn't (a washing machine only has one job too!)? Yet it is one that does its job exceedingly well, though I did find the little display screen unnecessary on a waffle maker. It comes with 4 preset settings -- Belgian, Classic, Chocolate and Buttermilk. I haven't explore all 4 settings in detail, but primary observation shows that the only difference between them all is the timer. If I want a custom timing, I can set one under 'Custom' setting, presumingly all under the same temperature. In that case, the preset settings are more of a shortcut, for convenience sake instead of functionality.

If the waffles turned out lighter than I'd like them, there's always the "a bit more" button which sets the waffles to cook for, well, a bit more or 1 min to be exact.

A dousing cup is included with the machine, but I didn't find it particularly useful. The first time I tried using it (1/2 cup for 1 waffle, according to instructions), there was overflow everywhere.
Cleaning
Then comes the age old nightmare of cleaning up the gloopy mess of escaped batter, except it isn't a problem anymore. The heated moat catches and cooks the overflow, so you can just eat throw them away afterwards.

Ease of cleaning is one very important aspect of any kitchen equipment. Thanks to the non-stick coat, it is a breeze to clean this iron. A swipe and a wipe is all it takes, literally! And because of it, I don't have to grease the iron with extra butter or oil! Yay to healthier waffles!

Price
Inevitably, as much as I love the Smart Waffle, it's hard not to notice the huge price tag. I feel the pinch even at a 30% discount. But we really do love our waffles, and can probably "break even" in a year's time, given that we consume 4 slices every other week, which is not all impossible.
Space
But because of my cutesy kitchen; it hasn't quite earn a permanent spot on my limited countertop space (see above), so I have to store it in the cupboard. Carrying it in and out isn't an easy feat considering that the machine has a cast iron plate, it is heavy and bulky. Well at least I won't call it "easily maneuverable". Most mornings, I feel too lazy to be lugging heavy equipments around. It doesn't help that my eyes are half closed too! All these contributing factors, hmm.. I don't think I'll make waffles as often as I'd like. Perhaps I'll stretch that break even period a little longer (or until I get a bigger kitchen).
To buy or not to buy?
This is probably the best waffle maker in the market right now. Although it costs more than what you would usually pay for a waffle maker, but personally, I'd rather have a reliable machine that produces consistent results every time than one that produces excellent first batch but limpy subsequent batches. Not to mention the horrid mess it might create along the way.

At first glance, some of the features seem a little useless, but I suppose it'll help save some time and takes a little off your mind especially if you have kids running around the kitchen yelling "Mummy, I want this! I want that!". You can attend to them first without having to worry about burning down the kitchen.

All in all, if you love waffles (I mean LOVE!), have the kitchen space and extra cash, the Smart Waffle is a really good investment. Afterall, who doesn't love waking up to crispy golden waffles?


DISCLAIMER: The blog and me are not affiliated to any constituencies of any sort. This post is set up to share thoughts/conclusions/reviews on various topics, such as food, products and restaurants. I have, by no means, any intention of flaming, defaming, accusing and insulting any individual/establishment. No benefits in any form, monetary or otherwise, was exchanged for the post. The writing is not influenced by any parties, and is based solely on my personal thoughts, preference, observations and biasity, if you will. Take it with a pinch of salt.

All blog posts and photos are properties of WhatToBakeToday (unless otherwise stated). Unauthorized use and/or duplication of these contents, whole or part thereof, without express or written permission from this blog's author is strictly prohibited. Excerpts and links may be used, provided that full and clear credit is given to WhatToBakeToday with appropriate and specific direction to the original content. 

Classic Waffle (Basic)

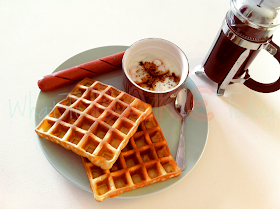
When walking past a bakery that sells waffles, I find it hard not to buy one. Especially when it's still cooking, the aroma of freshly made waffles is simply too alluring for me to resist! It sounds weird but it smells of warmth and cosiness, perhaps it's due to the Maillard reaction, much like the smell of freshly baked bread. To kick it up a notch, there is an array of fillings to choose from. I used to like having Kaya (asian coconut custard) between my waffles, but now I just opt for kosong (empty) so I can enjoy waffles as they are (...and also to watch my weight).

Since we made the move, waffle-selling bakeries are no longer a common sight, so the only way to feed my cravings is to make it myself.
Technically speaking, waffle batter is the same as pancake batter! Just a handful of ingredients, a couple of tries and we got the taste and texture we like. Hmm.. But the credit goes to the machine, it did most of the work! Hahha..

Classic Waffles (serves 2)

Mixture A
  150g     Milk, whole fat
    45g     Oil
      1       Egg

Mixture B
  100g     Plain Flour
      1g     Baking Powder
    30g     Sugar
   pinch of salt
1. Mix (A) until homogeneous. Sift (B).

2. Pour (A) into (B), combine till mixture is smooth and lump-free. Set aside for at least 10 mins, and heat up your machine while waiting.

4. Pour batter into machine and cook according to the manufacturer's instruction.
Thoughts: The waffle is crispy on the outside, spongy on the inside, exactly the way we like it. Sugar is probably the only thing you have to adjust if you had always prefer a sweeter waffle. Most days, I like to have maple syrup on the side, so I can have it sweeter if I want to. Otherwise, this sweetness is just nice.
This waffle is delicious on its own, but it tastes even better with savoury dishes! Ok, maybe that's a personal choice. If you don't already know I'm a fan of sweet and savoury combinations! I love eating it with scrambled eggs, cheeses or using it as bread for sandwich. I even eat them like soldiers, dipping and swirling them in my soft boiled eggs. Mmm mm... Can't tell you how good it is, coated with creamy goodness from the yolk. You'll have to try it for yourself.


All blog posts and photos are properties of WhatToBakeToday (unless otherwise stated). Unauthorized use and/or duplication of these contents, whole or part thereof, without express or written permission from this blog's author is strictly prohibited. Excerpts and links may be used, provided that full and clear credit is given to WhatToBakeToday with appropriate and specific direction to the original content. 

Fondant: Adventure Time

Since venturing with my sis-in-law, I never really have the courage to deal with fondant. There are too many potential pitfalls resulting in countless sleepless nights and mad rush for time, usually cutting it very close to the deadline. The mere thought of dealing with fondant makes me shudder with fear.
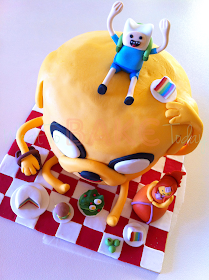
But today, 12th Nov, is my hubby's birthday! And he requested for an "Adventure Time" fondant cake. So there's nothing I can do, but bite my teeth and go with it.
After 4 days of grueling work, getting cross-eyed, sore arms, numbed fingers along the way, I finally had it done. Too much effort for me not to share the final product. All the fondant experts, please give me some pointers on how to do a better job next time (if I still want to go through it again >.<). 
The biggest problem I had was covering the cake with fondant; I couldn't smooth out the "elephant skin" without tearing the fondant altogether. Other than that, I thought figurine-making is fun, reminds me of playing play-doh during childhood.
I think I did alright given it was my first time, and no chance to go running to my sis-in-law for help. Thankfully, hubby loves it albeit commenting that Finn doesn't look like Finn, and Flame Princess is too fat. Oh well, blame it on my fat fingers! Heehee... Happy Birthday dearest! I will do a better job next year! 


All blog posts and photos are properties of WhatToBakeToday (unless otherwise stated). Unauthorized use and/or duplication of these contents, whole or part thereof, without express or written permission from this blog's author is strictly prohibited. Excerpts and links may be used, provided that full and clear credit is given to WhatToBakeToday with appropriate and specific direction to the original content.