Smoked Chilli Salted Caramel Popcorn Chocolate Cake

Smoked chilli with salted caramel, popcorn and chocolate!? Yes, you heard me right. Smoked chilli with salted caramel, popcorn and chocolate, everything in a cake. These were the flavours I used for the cake for my birthday, which happened just couple days ago. I'm pretty excited to pen down the recipes because I love it so much and also because my bestie is visiting at the end of week and I'll be busy, busy, busy again, no time for posting.

Initially I just wanted to make a salted caramel chocolate cake for my birthday. But it was ohhh-sooo-boring. So I decided to "spice" things up by adding chilli to the flavour list. I have always enjoy chilli in my chocolate so I know they'll work together. And of course, there has to be popcorn to celebrate my birthday. And I need an excuse to open the bag of chilli caramel popcorn, we bought at the market just a few days before. It has been taunting me since and I need to munch on it!

I need to admit though, the addition of smoked chilli was a huge risk, totally impromptu, totally unplanned for. I stumbled upon smoked paprika while searching for my chilli powder. Out of nowhere, I decided to go with my guts and added it straight. Even though my head was telling me that the smokiness may (or may not) throw off the delicious combination of chilli, salted caramel and chocolate. Thankfully, my guts were right, and they were really happy when I chomped down the cake.

Smoked Chilli Salted Caramel Popcorn Chocolate Cake (makes 6" round)


"American" Mud cake (makes 2x 2"x6" cake)

(recipe adapted from CakePaperParty)

 150g     Butter, unsalted

 140g     Chocolate couverture, 70% cocoa and above
 100g     Caster sugar
 100g     Brown sugar
 200g     Coffee
   10g     Vanilla extract
     2       Large eggs
 190g     Plain flour
   40g     Cocoa powder
     3g     Baking powder
  4.5g     Baking soda
  2.5g     Salt

Preheat oven to 175ºC

1. Sift together flour, cocoa powder, baking powder, baking soda, salt and reserve.

2. Melt butter and chocolate couverture over a bain marie. Stir with a spatula till the mixture is smooth and remove from bain marie.


3. Whisk in both sugars till incorporated. Then slowly stir in the coffee in a few additions, whisk until smooth before adding in the vanilla extract, followed by the eggs, one at a time.


4. Add in the cocoa flour mixture in a few additions and mix till batter is smooth and fully combined. You don't have to worry about overworking the batter for this recipe. In fact, overworking helps develop the gluten which results in a dense texture which is sought after in this cake.


5. Pour into lined cake tins and bake 30-35 mins or till cake tester comes out clean. It will take significantly longer time if only 1 cake tin is used.


6. Let cool in tins for 10 mins before cooling completely on a wired rack. Check that the cake has cooled completely before frosting.


Smoked Chilli Salted Caramel Ganache

 150g     Dark chocolate couverture, 70% cocoa and above
   50g     Heavy cream
 100g     Salted Caramel
dash of smoked paprika to taste
dash of chilli powder to taste
more salt to taste

1. In a small sauce pot, heat heavy cream till it's simmering and pour over the chocolate couverture. Let sit for 1 min or so before stirring to incorporate.


2. Stir in the salted caramel, smoked paprika, chilli powder and salt to taste.


3. Let the ganache cool slightly before frosting. It will be very difficult to frost if ganache is too warm and runny.


Assembly

1. Divide cake into 4 equal layers. Sandwich each layer with ganache. Then frost the whole cake in ganache, smooth the exterior as you frost. Reserve and wait for ganache to set completely.

2. Pour chilli caramel popcorn (or just regular popcorn) over the top of the cake to garnish. Drizzle with more salted caramel to decorate.

Thoughts: If you like your chocolate cake to be dense and fudgy, you are in for a treat. This is by far, the best, the "fudgiest" chocolate cake I have come across. Honestly, I don't know where mud cakes originated from, CakePaperParty says Australia whereas I found America, but when I bite into that cake, I seriously don't care. It is really good, so good my hubs asked me to make it again for his birthday which isn't going to happen until November. Usually it takes him a long while to decide what cake flavour he wants. Not for this cake.
I was pleasantly surprised how well the smokiness got incorporated with the rest of the flavours and ties in with the savoury aspect of it. There was more depth in its flavour, more "dynamic" and set the cake apart from the usual salted caramel chocolate cakes. However, I did wish for it to be hotter and that I had use a heavier hand when adding the chilli powder. There was just a mere lukewarm sensation at the back of my throat, not exciting enough for me. I was particularly careful with the chilli powder because I love my chillies and can take a lot of heat, more than what most people can take comfortably. I didn't want to end up having to finish the whole cake by myself, although I absolutely wouldn't mind that, but I might have to change my whole wardrobe after that.
And the chilli caramel popcorn? Never enough. I took out more to go with the cake since it provided a good textural contrast, plus it gave me more of the chilli kick I was looking for. Oh yes, and more salted caramel, drench me in that gooey goodness!

All in all, I LOVE my birthday cake. No one suffered from my abomination. Hubs loved it. I loved it. And of course, my guts loved it.


All blog posts and photos are properties of WhatToBakeToday (unless otherwise stated). Unauthorized use and/or duplication of these contents, whole or part thereof, without express or written permission from this blog's author is strictly prohibited. Excerpts and links may be used, provided that full and clear credit is given to WhatToBakeToday with appropriate and specific direction to the original content. 

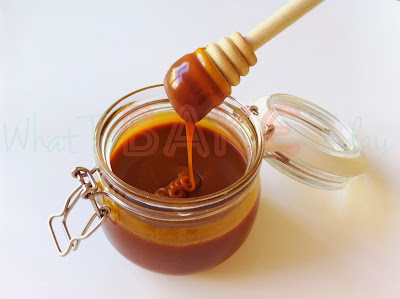
Salted Caramel

Salted caramel... mmm... Supposedly created by Henri Le Roux in Brittany (you still can buy "his" chocolates!), this dangerously addictive combination was once again made popular by the macaron maestero, Pierre Hermé, when he decided to adopt the flavour in his macarons. Ever since, our love for salted caramel spreads like wildfire, from the high end restaurants to the local supermart's home brand chocolates. This stuff is ubiquitous!
Some argue that salted caramel is yet another food fad, much like cupcakes and superfood trend; they come and they go. I beg to differ, of course. Some food are never meant to be out of trend. I mean NEVER! Think crispy bacon, oozing egg yolk and golden french fries, I don't think they will be out of trend. And it's salted caramel we're talking about here! Can never get tired of sweet and savoury goodness, chocolate (peanut butter) pretzels, salt on watermelon, prosciutto melon and yes, sweet potato fries, oh my god.

Salted Caramel (makes about 1 cup)
(recipe from Drizzle & Dip)

 200g     Sugar
   85g     Butter
 125g     Heavy cream

    4g     Sea salt, more or less to taste

1. In a saucepot, heat sugar over medium heat, till it caramelises and all the sugar has dissolved.

2. When the caramel turns to the colour you prefer (golden to deep amber), add butter in a few additions while whisking constantly. The mixture will splatter, hiss and bubble up quite vigorously. Work cautiously or wear oven mitts.

3. Slowly drizzle in the cream while whisking constantly till the caramel is smooth and homogenous.

4. Remove from heat, and whisk in sea salt till it dissolves. Let the caramel cool before using.

Optional
5. When the caramel has cooled, stir in additional sea salt, without dissolving it too much.
Thoughts: With just 4 ingredients and probably 15 minutes of your time, it's really easy to make caramel at home. If you buy caramel in the form of a squeezy bottle, save money and start making your own. You will love this so much more. If you don't like the salted version, melting in chocolate will equally rock your world.

It's important to take note of the colour change when making the caramel. Too light (too early), you will have a sickeningly sweet "sugar sauce" which lacks depth in favour. Too dark (too late) and it will be burnt. You "stop" the caramelisation by adding the butter. I prefer this deep, rich, amber colour to my caramel, slightly before it burns and reaches the point of no return. Takes a few practice before knowing when to add in the butter, and how you like it exactly. I have burned my fair share of caramel. Ieks.
There are countless applications for salted caramel. Use them in other bakes, swirl into your brownies, make into a cake frosting or sandwich it between 2 macaron shells like Mr. Hermé. If you don't bake, there are still many ways to lap up this sauce. Stir it into your drink, coffee, chocolate, tea, anything really. Pour over ice cream, cakes, cookies. Or just eat them by the spoonfuls when no one's watching. Salted caramel makes everything awesome. Drizzle them over some fruits and suddenly everyone loves eating fruits.


All blog posts and photos are properties of WhatToBakeToday (unless otherwise stated). Unauthorized use and/or duplication of these contents, whole or part thereof, without express or written permission from this blog's author is strictly prohibited. Excerpts and links may be used, provided that full and clear credit is given to WhatToBakeToday with appropriate and specific direction to the original content. 

Soya Bean Chiffon Cake

I probably mentioned before that I don't like changing recipes. So when I want to attempt a new flavour, I just mess with the trialed and tested recipes that worked for me. Sometimes it takes more than a few tries to get it right but when everything falls into place, the sense of satisfaction is beyond description.
The idea of a soya bean chiffon cake came from Keiko Ishida's Okashi (don't ask me if she's original though) but I am hesitant to use her soya bean chiffon recipe because I tried another flavor of her chiffon recipes yet its texture didn't turn out as soft as we're used to. Another day perhaps, but for now, I'll just stick with the recipe I've been using all along.
Soya Bean Chiffon Cake (yields 21cm tube tin)
(recipe mashed together with Richard Goh's recipe and Keiko's idea)

Mixture A
     5       Egg Yolks
   20g     Brown Sugar
   20g     Castor Sugar

Mixture B
   60g     Corn Oil
   70g     Soy Milk
   
Mixture C
   50g     Plain Flour
   30g     Corn Flour
   30g     Kinako Powder

Mixture D
     5       Egg Whites
   80g     Castor Sugar

Preheat oven to 170ºC
1. Whisk (B) till homogeneous and reserved. Sift together (C), whisk briefly and reserved.


2. Using a whisk attachment, whisk (A) at maximum speed till colour turns pale and volume has doubled.

3. Reduce the speed of mixer and slowly add in (B) till incorporated. Add in (C) and whisk till batter is thick, smooth and lump-free. Transfer batter to another bowl, wash and clean mixer thoroughly.

4. Using the whisk attachment, whisk the egg whites till almost soft peaks and gradually add in the sugar. Stop whisking when meringue turns glossy and just reaches stiff peaks.

5. Gently stir in 1/3 of the meringue into the batter to lighten the mixture before folding in the rest with a very light hand. I highly recommend using hands. If uncomfortable, any other apparatus will work. Spatula, whisk or wooden spoons. Contrary to popular sayings, you can fold in, stir in, cut in, clockwise, anti-clockwise, it doesn't matter as long as you maintain a gentle touch, it will work. 


6. Sharply rap the bowl against the counter top a couple of times to release trapped bubbles before pouring into the tube tin.

7. Place the cake at the lowest possible rack and bake for 45-55mins till cake has domed.

8. Immediately turn the tin over and elevate it using a bottle/funnel and let cool completely. 


9. When completely cooled, insert a sharp knife and go around the sides to release the cake. Try to use one swift movement and keep the blade as close to the tin as you can. Repeat the same for the bottom of the cake. 
ThoughtsMaybe the Kitchen God or the Baking Goddess was on my side that day, the recipe which I put together worked like a charm. Soft and spongy texture with a smooth, crack-less top. It tastes less of the soy milk flavour we are used to and more of the fragrant Kinako powder, which is made from grounded roasted soya beans. Comparatively, it is milder and more subtle than peanut powder. It can be purchased from Japanese grocery stores such as Daiso or Meidi-ya at Liang Court.
The interesting thing is that the flavour actually intensified after sitting overnight at room temperature, as if like ageing macarons, allowing for flavours to mature. The delicate nutty flavour is pleasing on the palate (even for someone who dislike peanuts) with just a slight hint of soy milk aftertaste. Wash it down with a cup of hot green tea... Ahhhh... Life is good. 


All blog posts and photos are properties of WhatToBakeToday (unless otherwise stated). Unauthorized use and/or duplication of these contents, whole or part thereof, without express or written permission from this blog's author is strictly prohibited. Excerpts and links may be used, provided that full and clear credit is given to WhatToBakeToday with appropriate and specific direction to the original content.