Pages

Kūčiukai (Lithuanian Christmas Eve Biscuits)

Christmas is nearing once again and that marks the start of the feasting festive season. As families gather, I always try my best to create yummies that can be enjoyed by everyone. But as the years slipped past, there came more dietary restrictions and our preference towards sweets changes. Gone are bakes such as Eggnog Créme Brûlee tart and Bûche de Noël, and I try to replace them with equally festive yet less sugary (sadly also less fanciful) options like Stollen and Fruitcake
The same quest continues this year, but nothing suitable came out from my internet research. Coincidentally, there was a travel show on TV, featuring traditional Lithuanian 12 course Christmas eve dinner which is strongly tied to their religious beliefs. It consists of no hot food, no dairy products, no meat and supposedly, rather bland. For dessert, the dinner ends with Kūčiukai which are bite-sized, yeast leavened poppy seed biscuits, and the older generations will pour aguonų pienas (adhering to the non dairy restriction) over the biscuits and enjoy them like cereal. Aguonų pienas is a whitish drink made by repeatedly crushing soaked poppy seeds, aptly translated to poppy seed milk. The process is quite laborious, so some younger generations have updated with time, and prefer to enjoy the biscuits with a glass of cold milk on the side.
Kūčiukai (makes about 100 pieces)

 250g     Plain flour
   25g     Poppy seeds
     3g     Salt
   30g     Butter, unsalted, melted

 100g     Warm water, about 35˚C, no higher than 40°C

   50g     Sugar
     7g     Yeast

Preheat oven to 180˚C

1. Add sugar and yeast to warm water, mix and leave to activate for about 5 mins.

2. Add the poppy seeds and salt to flour and mix it briefly till they are evenly distributed.

3. Add in the melted butter and yeast mixture to the flour. Then using a hook attachment, mix the ingredients on med-high speed for approximately 5 mins. The dough should feel soft and slightly sticky when done.
4. On a lightly floured surface, hand knead the dough for about 2-3 mins until it is no longer tacky to touch. Form the dough into a smooth round ball and place it in a lightly oiled bowl. Cover with cling wrap and leave it in a warm place to prove for 1-2 hours.
4. Divide the dough into 4 pieces and roll each into a snake-like rope, about 2cm in thickness. Then cut the rope into approximately 2cm individual pieces.

5. Place the dough pieces on a lined baking sheet with a spacing of 0.5cm. Bake for 13-16 minutes until the edges are golden brown and slightly crisp.
6. Leave to cool completely on a wired rack before storing in a biscuit tin or airtight container.

7. Serve as it is or with a glass of cold milk on the side or with aguonų pienas poured over it.


Thoughts: I quite like the idea of traditional Lithuanian Christmas dinner, not just because they're still closely related to their religion but also that they take it as time to remember their deceased. In fact, Kūčiukai is supposed to be a form of ritual bread meant for the souls; its bite size to represent that souls have no material bodies and making a lot of them to represent the sheer number of souls. The unfinished food will also be left on the table overnight as it is believed that their deceased loved ones will visit in the night and feel welcome by the spread. I can resonate with their beliefs because I tend to think more of my beloved grandparents during festive celebrations. Things are different when loved ones are no longer here, but I think it's heart warming that they still try to "involve" the deceased into their celebrations.

Like aforementioned, a traditional Lithuanian Christmas dinner should be meatless, non-dairy and consists of no hot food. But since I'm just after a healthier Christmas sweet, I chose this recipe that includes a minimal amount of butter for a little flavour. If for health, religious or whatever reasons, butter can't be consumed, these can remain a vegan snack by replacing the butter with equal amount of neutral tasting vegetable oil such as canola.
Although Kūčiukai is labelled a biscuit, it's texture and taste is more bread-like. Softer than biscuit, firmer than scone, with a prominent yeast taste. To be frank, I didn't like it at all on my first bite simply because it wasn't what I expected of biscuits. But as I ate more, the taste grew on me. Slightly nutty, a little salty, a little sweet. Perhaps this is one of those food that requires an acquired taste, just like sambal petai! Or maybe I just wasn't used to it. Either way, I love them now and had since made 3 batches to share with my family. It's a lot healthier compared to the usual holiday sweets. Try them this holiday season, and celebrate Christmas without having to worry about putting on weight. 

Su šventomis Kalėdomis!


All blog posts and photos are properties of WhatToBakeToday (unless otherwise stated). Unauthorized use and/or duplication of these contents, whole or part thereof, without express or written permission from this blog's author is strictly prohibited. Excerpts and links may be used, provided that full and clear credit is given to WhatToBakeToday with appropriate and specific direction to the original content. 

Oden (Japanese Hot Pot)

As the weather gets cooler for the rest of the world, Winter has passed in the topsy turvy world of Australia. One of our favourite comfort food for cold weather is hot pot, sometimes known as steamboat. There are several variations depending on country, region and cuisine but I love them all! We were having so many hot pots during the past Winter; I overstocked too much assorted hot pot ingredients in the freezer. Until I clear the stash, I won't have space to store my sambal, ice cream, or anything really. Perhaps we can do one last hot pot before the weather really gets unbearably hot. And for that, I'll go with one of my favourite -- Oden. 
Strictly speaking, Oden shouldn't be called a hot pot, it is more of a "soupy", "stewy" dish. Traditionalists might shake their heads in disapproval because in Japan, Oden is served as a completed, cooked dish. Not a hot pot. The real Japanese hot pot is call nabemono which includes the popular Sukiyaki and Shabu-shabu (both my favs too!). But I like Oden and I like the idea of sitting around a steaming pot of soup in the cold weather and cooking even more food as we eat, so I'm happy to make this mistake deliberately. =)
Oden (serves 2-4)
(recipes and instructions from ochikeron and cookingwithdog)


Dashi Stock
2 liters Water
15cm   Kombu
  50g    Katsuobushi
Seasoning (to taste):
  30g    Light soy sauce

  30g    Mirin
1 tsp    Salt

1. Soak Kombu in water for 1-2 hours. Bring to a simmer and add katsuobushi then cook over low heat for 2-3 minutes.

2. Remove dashi ingredients and strain the stock with a paper towel. Season to taste.
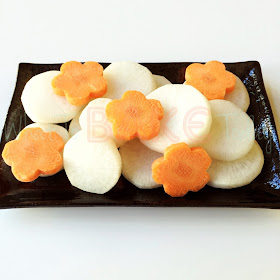
Daikon (White Radish)
1. Peeled and cut into approx. 2cm rounds. Do a mentori by planing off the edges, it will prevent the daikon from crumbling.

2. Make light cross incision on both sides.

3. Bring Kome no Togijiru (leftover water from washing rice) to a simmer, and parboil the daikon rounds for 15 minutes. It will help in keeping the daikon's colour and remove some bitterness.

4. Drain and wash them with warm water. Pat dry with paper towels and reserve.
Carrot
1. Peel and cut into approx. 1cm rounds. Optional: use a cookie cutter to get flower shape.

2. Parboil, drain and reserve.
Assorted Surimi products (if fried)
1. Pour boiled water over the fried surimi products to remove surface oil. Drain and reserve.
Konnyaku aka Konjac
1. You may either cut the Konnyaku into:
  • Triangles - make light cross incisions on both sides of the konjac and cut them into triangles
  • Braids - cut into 5cm pieces starting from the shorter side of the Konnyaku. Lay each piece flat and make 1" cut in the center, leaving at least 1cm at the top and bottom uncut. Slide one of the ends through the 1" opening to form a braid like pattern
2. Parboil, drain and reserve.
Mollet Egg
 2 Eggs, room temperature

1. Add some vinegar into a pot of water and bring to a boil.

2. Gently lowered the eggs and cook for 6mins.

3. Shock the eggs in ice cold water.

4. Peel and cut lengthwise. 
Takara Fukuro (Treasure Bag) 
  2     Aburaage 
60g    Pork mince
  4     Tofu, 2" pieces or Mochi if available
20g    Cabbage, chopped
Optional: Chives or spring onion, blanched

1. Pour boiled water over aburaage to remove surface oil. Pat dry with paper towels and cut into halves.
2. Open up the aburaage and fill with minced pork, tofu and cabbage.

3. Tie the opening with a piece of chive/spring onion, or alternatively, secure with a toothpick. Reserve.
Cabbage Roll Skewers
 2-4 pieces of Cabbage leaves
 bamboo skewers

1. Cook cabbage leaves in boiling water. Drain and remove the harder stem portion of the leaves.

2. Stack the leaves and roll into a log.
3. Stick the bamboo skewers into the cabbage log, leaving approx. 1.5" space between each and cut in between the skewers. 

Optional
4. You may stick assorted fish balls/cakes on top of the cabbage roll.
Thoughts: At first glance, the preparation work for the ingredients seemed too troublesome but as I got to doing, it's actually not as bad as I thought. Although if I'm after a lazy man's dinner/hot pot, I'll find this too much effort to prep for. On the good side, when there's leftover, I'll served it as the 1 pot dish it was meant to be, for the next day's dinner. Lazy indeed. Haha!

Like hot pot, you can choose from a variety of ingredients for this dish. However, many consider daikon, konnyaku and eggs essential for oden. Assorted surimi products, fried or otherwise are staples too. Frequently used ones includes hanpen and chikuwa but again there's no rules saying which is a must. 
I'd understand if some of the ingredients like konnyaku, mochi, hanpen and chikuwa can't be easily accessed, because I couldn't find mochi in the several Asian shops I went to. Hence, my takara fukuro has tofu instead of mochi within. Not the most authentic, but since I'm no Japanese; I'm happy with the rest that I managed to find. So if you just want to enjoy a Japanese-style hot pot or 1 pot dinner, and not serving any Japanese guests, just use any ingredients you like! As long as you're happy with the food, no Oden police will come after us! 


All blog posts and photos are properties of WhatToBakeToday (unless otherwise stated). Unauthorized use and/or duplication of these contents, whole or part thereof, without express or written permission from this blog's author is strictly prohibited. Excerpts and links may be used, provided that full and clear credit is given to WhatToBakeToday with appropriate and specific direction to the original content. 

Elderflower and Strawberry Roses Cake

Being the unofficial designated baker at home, I always try to bake the celebratory goods for various festive occasions. Ever since making the move, I don't have much chance to continue doing so. So when my parents visited me last month, I decided to bake Mum a birthday cake even though her actual birthday was 3 weeks before. It isn't often they get to visit so I thought it'll be a nice surprise for her. 

Mum never really liked rich, strong flavours with the exception of Fruitcakes. Something like the Smoked Chilli Salted Caramel Popcorn Chocolate cake that I made for my birthday, would just make her roll her eyes. Too rich, too fudgy and too "what-the-hell-is-that" for her. Her preference is skewed towards something floral, something fruity, or something tart.
It was the perfect opportunity to open the bottle of St. Germain Elderflower liqueur that has been sitting in my pantry for so long. I've always liked the subtle smell of these little yellow flowers so when I chanced upon the liqueur (which isn't very easy to find either), I bought it without knowing what to do with it. But hey, it's alcohol, at the very worst, I'd drink it. *gulp gulp gulp*

Elderflower is very versatile and its smell isn't too overpowering unlike how some culinary flowers can be. I find that it compliments quite a number of fruits too, but since strawberries is in season, I went along with that.
Elderflower and Strawberry Cake (makes 8" round)

Elderflower Victoria Sponge
(recipe adapted from AtHomeWithMrsM)

200g     Caster sugar
200g     Butter, unsalted, softened
   3g     Salt
 1tsp     Dried elderflower
     4     Eggs
200g     Plain flour
  10g     Baking powder
  45g     Milk
  30g     Elderflower liqueur

Preheat oven to 180°C
1. With a paddle attachment, cream together sugar, butter, salt and the dried elderflower till mixture is pale and creamy.

2. Add 2 eggs, the elderflower liqueur and half of the flour. Beat well to combine.

3. Add remaining 2 eggs, remaining flour, baking powder and milk. Beat well to combine. 

4. Pour batter into lined cake tin(s). Bake 50-60mins if using 1 tin or 25-30mins if using 2 tins, till cake tester comes out clean.

5. Let cool completely without removing cake from tin(s).

Macerated Strawberries filling
250g     Strawberries, washed, hulled, sliced 
  50g     Elderflower liqueur
  50g     Sugar (adjust more or less accordingly)

6. Combine all ingredients and let stand in the fridge for at least 1 hour.

Elderflower Whipped Cream
300g     Heavy cream, at least 35% fat content
  30g     Icing sugar
  50g     Elderflower liqueur

7. Whisk heavy cream and icing sugar to stiff peaks. Use a chilled bowl if needed.

8. Drizzle liqueur over the whipped cream and fold through gently.
Assembly

9. Divide cake into 4 equal layers. Brush the liquid of the macerated strawberries filling onto the cut sides of the cake. 

10. Spread a thin layer of elderflower whipped cream, lay on a layer of macerated strawberries and spread another thin layer of elderflower whipped cream on top. Place another cake layer and repeat the above steps till all cakes have been filled and stacked.

11. Crumb coat the entire cake, and let sit in the fridge for 30mins. 
12. Using a basketweave tip (wilton #48), create a basketweave pattern around the circumference of the cake. 

Strawberry Roses
25 or more strawberries, washed
toothpicks if needed
13. Carve strawberries into roses and arrange onto the top of the cake.

Thoughts: I had originally wanted to give Mum a bouquet of real flowers (saves time, less effort), but I thought Mum would enjoy a cake more. Thus the idea of creating a cake that looks like a "basket of roses". Agreed that it may not be the most challenging, and my piping work could have been neater, and that I could have made more strawberry roses, it is the best I can pull off with the time available. Given the simple techniques, I'm glad it turned out prettier than I thought it would and it looked like I had put in more effort than I did. What matters most is that Mum thinks the cake looked awesome and absolutely loved it!
The elderflower cake itself, however, is a little on the dry side and the crumbs is coarser than what I would have liked. I wouldn't categorise it as a "sponge cake" but the flavour is very pleasing as expected and makes a wonderful tea cake on its own. Brushing on the liquid from macerated strawberries did help moisten the cake and locks in the moisture. Plus with its tartness mellowed, the sweet-smelling strawberries complements the subtle floral smell while the elderflower whipped cream adds creaminess and ties everything together, making the cake even easier to fall in love with. This is one combination that's bound to woo the crowd's palate. 


All blog posts and photos are properties of WhatToBakeToday (unless otherwise stated). Unauthorized use and/or duplication of these contents, whole or part thereof, without express or written permission from this blog's author is strictly prohibited. Excerpts and links may be used, provided that full and clear credit is given to WhatToBakeToday with appropriate and specific direction to the original content. 

Kueh Jagung (Corn Hoon Kueh)

I've always wanted to make kueh and even compiled a little stack of kueh recipes that I want to try. But I never had the courage to do so for the longest time. Not until about 3 weeks ago, at the local "SG50 day" celebration where I bought 3 pieces of kueh for A$5. Ieks! I let out an internal scream when I heard the price (the seller is also smart enough not to put out price tags) but quietly dug the money out of my wallet. The auntie beside me voiced her dismay directly, to which the seller laughed and blatantly replied: "Because this is Australia"! 

That's when I know I need to start making kueh myself.
Actually, I tried making Kueh Lapis Sagu last week, but the layers weren't even and thin enough; the results weren't ideal. I'll write about them when I finally achieve the desired outcome.

So I went back to my stash of recipes and picked Corn Hoon Kueh as my 2nd attempt on kueh. It is one of my "must-buy" kueh whenever I go Bengawan Solo, together with Kueh Sarlat and Kueh Kosui. I didn't know the actual name for the kueh; it is always tagged as "Corn Kueh" in the shop. After asking a fellow blogger who is an expert in kueh, I now know it's called "Kueh Jagung" or "Corn Hoon Kueh".
Kueh Jagung (makes about 12 10x5cm parcels)
(recipe from eatapieceofcake)

Mixture (A)

 200g     Coconut cream
 350g     Water
   80g     Sugar

Mixture (B)
   90g     Hoon Kueh flour (aka Mung bean or Green bean flour)
 200g     Water

Mixture (C)
 120g     Canned corn kernels

Optional Banana leaves, cut into 15x20cm pieces

1. In a saucepan, mix (B) till smooth.

2. In another saucepan, bring (A) to a boil over high heat and until sugar dissolved. Slowly pour (A) into (B), stirring constantly over low heat.

3. Stir constantly until mixture thickens. Remove from heat and stir in the canned corn kernels.
4. Spoon ~4 tbsp of corn mixture onto each banana leaf and wrap it into a rectangular parcel.

5. Chill in fridge until set.
Thoughts: Straight forward instructions and fuss free recipe. The only "kind of" troublesome part is wrapping the mixture in banana leaves, which eatapieceofcake suggested that it can be set in jelly moulds instead. Apart from making the rectangle parcels that lay flat, I had fun wrapping them into the ones that stand, those secured with a toothpick and resembles Tapai Ubi. Gosh... I miss Tapai Ubi too, haven't had them since when I was a child. 
If you don't like corn, just replace them with bananas and they become "Kueh Pisang" which is also sold in Bengawan. I prefer the corn version so I didn't make any changes, and it turned out pretty close to the Bengawan Solo ones. I remembered the commercial product was a tad softer than this recipe, but I could be wrong since I haven't had it in a looooong while. That said, it is slightly sweeter for my preference, but all the others who had it commented that the sweetness is just right. Give the original recipe a go, and adjust the amount of sugar to your preference. Remember that when eating chilled food, it does slightly dull our taste buds so don't based the sweetness on when the mixture is still warm.

Kueh were daunting to me for reasons unknown, I don't really know why I was so scared of making them! Maybe some of them look too intimidating to me, with their colourful layers and multiple components. Maybe some of the processes seem too tedious and painful, with preparations sometimes starting a day ahead. 
Whatever reasons it was, I'm glad that this box of A$5 kueh (kueh sarlat, kueh lapis sagu, pulut inti) knocked me hard on my noggin (figuratively of course) and spurred me on. If not for the higher living expenses, I might still be reluctant to try making kueh. Blessing in disguise for me, sorta. 
As I onomnom on the kueh kueh, I realised it cost me less than A$8 to make this whole lot, including the banana leaves! Wow! Hopefully this beautiful realisation is enough motivation to make me embark on a kueh-making journey. Hahaha! Till the next kueh, enjoy! 


All blog posts and photos are properties of WhatToBakeToday (unless otherwise stated). Unauthorized use and/or duplication of these contents, whole or part thereof, without express or written permission from this blog's author is strictly prohibited. Excerpts and links may be used, provided that full and clear credit is given to WhatToBakeToday with appropriate and specific direction to the original content. 

Singapore-style Teochew Bak Kut Teh

August was especially hard to get by last year. It was the time when we lost the patriarch of the family -- my grandfather, my ah gong. He was good-natured, affable, easygoing, gregarious but fiercely independent as an old man. All my years, I've never seen him in a temper, mostly chillaxing with a beer or kopi-o in his hand and a cigarette in his mouth. He was slightly foul-mouthed but usually for hilarious reasons when he did curse. To top it off, he was an accomplished cook. You may think I'm exaggerating but there's no one whom I know that doesn't like him.

Ah gong is of Teochew descent and can be a purist at times, especially when it comes to cooking. Before his health deteriorated, he insisted on cooking meals to feed our huge extended family during every major festive celebrations and birthdays. This bak kut teh is a staple; we grew up on it. I don't think we can ever forget its taste. 
However, I don't recall him preparing bak kut teh just by itself. He had always cooked it with pig's stomach which essentially made the dish into pig's stomach soup... or so I thought. Turns out offals and some other ingredients were sometimes added to the fragrant pork broth. Over the years, we've pretty much separated everything into "individual soups" with the exception of mixed pig's organ soupbut you might still get offals, tau pok (dried tofu), mushrooms and what-nots in a Malaysian Hokkien bak kut teh.

Teochew Bak Kut Teh (serves 4)
(Please credit if you've enjoyed it. Thank you!)

2.5 litres water
1 kg pork ribs
3 heads of garlic, separated
2 tbsp white peppercorns, lightly crushed and toasted
salt to taste

1. Bring a pot of water to boil, and scald the pork ribs for 5 minutes. Drain and rinse briefly. 

2. Bring the 2.5 litres of water to boil, add the garlic, white peppercorn and pork ribs.

3. Bring it back to boil, season with salt and simmer for at least 1 hour. 

4. Serve hot with steamed rice/ you char kway (Chinese fried dough fritter) and chilli padi in dark soya sauce. 

Thoughts: Despite preparing this couple of times, somehow I feel there's something missing in the soup, maybe I didn't listen carefully when ah gong was teaching me or maybe I forgot something because it just doesn't taste the same. I don't remember him adding anything else. Well, except he did like to add canned button mushrooms (for the kids), in which case I would devour most of them first before others can get to it (opps!). Maybe I can never cook this or other dishes as well as he did, simply because it wasn't him behind the stove. I remember its taste but I can't do an exact replica, this is as close as it gets. 
Yet this is a simple, delicious pork broth of garlic and white peppercorns, though some people may add Chinese herbs like angelica sinensis (当归) and/or wolfberries/goji berries (枸杞子). For the ribs, any part is acceptable depending on your preference. I use a mix of spare ribs and baby back ribs whenever possible. Might not be the most authentic, but I have to satisfy the carnivore in me. 

I won't touch on the history nor the variations of bak kut teh in this post. Many have that covered, argued about the origin and about which is the "better" version. Why can't we just agree that each country/dialect came up with their respective version? Perhaps "modified" it like so many bloggers do nowadays and pass off as theirs or more likely, adjusted the recipe purely to suit their tastes. It's not uncommon knowledge that hokkiens have a liking for stronger-tasting food while teochews prefer lighter dishes.

But seriously, I couldn't care less, I respect and enjoy both versions. This is a dish with humble beginnings, created out of pragmatism to feed the pioneers who helped build the country. Available across our little island and easy to prepare at home; it had warmed our hearts and tummies throughout the years and will continue to do so for many more to come.


All blog posts and photos are properties of WhatToBakeToday (unless otherwise stated). Unauthorized use and/or duplication of these contents, whole or part thereof, without express or written permission from this blog's author is strictly prohibited. Excerpts and links may be used, provided that full and clear credit is given to WhatToBakeToday with appropriate and specific direction to the original content. 

Profiteroles (Choux Pastry)

With its origin in France, this dainty pastry has another fancy French name -- chou à la crème. But most of us should be more accustomed to calling it profiteroles, or simply cream puffs. It has a light pastry shell made from pâte à choux (choux pastry), encasing various sweet fillings, sometimes with a crispy top when baked with a thin piece of craquelin or sometimes with a crisp chocolate shell when dipped into tempered chocolate. 
I grew up with cream puffs from neighbourhood bakeries in Singapore. My childhood version is simply filled with thick custard, probably made from custard powder. No crispy top. No chocolate shell. Nothing fancy, but this simple puff captures the heart of many Singaporeans. As you bite into the chilled puffs, the cold custard slowly melts away in your mouth, cooling you down as you chew. The perfect snacks when the weather gets too hot, which in Singapore, is everyday! 

I was already in my twenties when I first had a profiterole that's filled with lightened crème pâtissière. And I love it even more. I even had a croquembouche that has choux filled with an alcoholic bourbon mousse at my wedding. Our guests loved it so much, they devoured the whole tower before the wedding photographer can manage a photo!
Ladurée's recipe is the only choux pastry recipe I've worked with. While I like its taste, I had issues with parts of its instructions. However, since I'm not professionally trained, I acknowledge that the problem might lie with me instead of the recipe. Hence, my adjustments will be in pink for your reference, and its explanation will follow through in the section below.

Profiteroles (makes about 25 small puffs)
(recipe from Ladurée: Sucré The Recipes)

Choux Pastry
 120g     Cake flour
   10g     Caster sugar  a pinch of salt

 100g     Milk
 100g     Water
   80g     Butter, unsalted
      4     Eggs, cold (actual amt. of eggs varies each time, from 3-5)

Crème Diplomat or Lightened Crème Pâtissière (or other preferred fillings)

 Crème Pâtissière 
 150g     Heavy cream, chilled (aka whipping cream or double cream)

Preheat oven to 180°C (190°C)
1. Sift together the cake flour, sugar and salt. Reserve.

2. In a small sauce pot, bring the milk, water and butter to a boil. Remove from heat, and add all of the sifted flour mixture at once. 
3. Stir vigorously with a wooden spoon or a heat resistant spatula until a dough forms and pulls away from the sides of the pot. (Put it back on low heat and continue cooking the dough for about 1-2 min) Set aside and allow to cool slightly.

4. Stir in the eggs, one at a time, making sure that each is fully incorporated before adding the next. (You may need anywhere from 3-5 eggs, sometimes half an egg. It will look separated but keep mixing and it will come together)
5. Transfer batter into a piping bag fitted with a 10mm plain round tip. Holding the bag vertically, pipe rounds of ~4cm onto lined baking sheet, leaving a space of ~1" between each. 
  • Moisten a pastry brush or fingers with water (or eggwash if you have leftover from step 4), gently dab the pointy ends into rounded tops.
6. Bake in preheated oven for 8-10mins until they rose, then jam open the oven door very slightly (~3mm) with the handle of a wooden spoon, to allow for steam to escape. Continue baking for a further 20-30mins with the door slightly ajar, until the pastries are golden. (I baked at my preheated temperature for 25-30mins with no opening of doors) Let cool completely on wired rack.

7. Whipped the whipping cream to stiff peaks and gently whipped the prepared creme pat just to loosen it up. Fold both mixtures together and transfer the lightened creme pat into a piping bag fitted with a filling tip (Wilton #230).

8. Make a small slit in the bottom of each pastry and pipe in the lightened creme pat. Chilled in refrigerator until ready to serve.
Thoughts: It was about 2 years ago when I first tried making profiteroles. I didn't do any reading or research before my virgin attempt and it was a total flop, literally. I followed the recipe to a T and added 4 eggs as stated. The batter was loose and didn't hold its shape, but of course I didn't know better, so I proceeded to baking them. They did start rising at about the 10mins mark, so I cranked open the oven door as instructed. I watched in horror as they started deflating and stayed as a flat pancake abomination throughout the rest of the baking. I still tried one regardless; the interior was moist and chewy, it was horrible. 

Sore from my failure, I studied other recipes, read up on chef forums, understood the science behind before making adjustments to the recipe. And... my 2nd attempt was a glorious success! That taught me to always do my "homework" before attempting something new. Here are the explanations:
  • I find the original temperature a little low to let the pastry rise properly, some recipes uses 200°C, some starts high and ends low. 200°C browns too fast for me, 190°C works beautifully
  • Cooking the dough for a further 1-2mins draws extra moisture out of the dough so more eggs can be incorporated. More eggs = more fat = yummy pastries
  • The amount of eggs used are never the same every single time. It's not only dependent on the size of the eggs used, but also how much moisture has been cooked out of the dough in the previous step
  • Like macaronage, you have to judge the consistency of the batter and decides if it has taken enough eggs. The batter should be smooth and glossy, it's still somewhat stiff but you can "cut" through it with ease with a spatula and should falls reluctantly (in about 3s) in a large blob when lifted
  • As an insurance, I prefer to use cold eggs to prevent potential curdling, in case the dough hasn't cooled enough. It's optional, and room temperature eggs can be used if you ensure the dough is cool enough (eggs coagulate around 62°C)
  • Rounding the pointy ends of piped batter will result in a beautiful round top when baked, else they will burn before the pastries are done
  • Letting steam escape by opening the oven door during the early stage of baking is risky as cold air may rush into the oven, dropping the oven temperature too much. The pastry may have risen, but the batter has not dry enough for the top to be light and the internal structure to be "sturdy", hence collapsing on itself
  • Some recipes swear by making a slit in the pastries as soon as they are removed from the oven to let the trapped steam escape. I've tried both slitting and not slitting, but it didn't seem to make any significant difference (for me at least) so I prefer to slit them when they've cooled and save my fingers from burning
Seems like a lot of points to note, doesn't it? But once you've understand the process, it will come to you naturally. It's annoying to take note of so much even before baking, but I'm more annoyed when my bakes fail.
For this post, I chose to slice open the choux so that the creme pat can be seen. Plus, strawberries are in season and they are the classic combination with cream; how can I resist not using them?! Apart from creme pat, you can fill them with any other fillings you want, Salted Caramel cream, Lemon curd or even the Strawberry Rhubarb curd I shared last week. Another very popular filling in Singapore is fresh durian meat, which happen to be in season now too! I managed to smuggle bring some back so a few friends got to savour the heavenly taste we all missed. I like to stuff the choux pastry to the brim, and make them look as if they are about to burst from the durian goodness! Shiok to the max!

Regardless what filling you used, these little cream pouches are so endearing to look at, you'll love it even more when devouring them. Very moreish, I find it hard to stop at one!


All blog posts and photos are properties of WhatToBakeToday (unless otherwise stated). Unauthorized use and/or duplication of these contents, whole or part thereof, without express or written permission from this blog's author is strictly prohibited. Excerpts and links may be used, provided that full and clear credit is given to WhatToBakeToday with appropriate and specific direction to the original content.

Crème Pâtissière

Creme patissiere, or pastry cream, is an egg-thickened sweet custard, commonly flavoured with vanilla. Made from just a handful of ingredients, it is one of the basic component a chef patissier has to learn. Pastry cream is used across a wide range of desserts so once you've mastered it, the options are limitless.
Crème Pâtissière (makes about 2 cups)
(recipe from Ladurée: Sucré The Recipes)

 400g     Milk, full fat
      1     Vanilla Bean (or 5g Vanilla Extract)
      4     Egg yolks
   80g     Caster Sugar
   15g     Cornstarch (aka corn flour)
   25g     Butter, unsalted

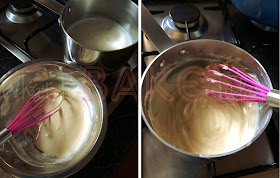
1. Slice the vanilla bean in half lengthwise, and scrape out the seeds. Pour the milk in a saucepan and add the vanilla pod and seeds. Bring to a simmer. Remove from heat, and cover immediately. Allow to infuse for 15 minutes.

2. In a large bowl whisk the egg yolk and sugar until slightly pale. Incorporate the cornstarch. 

3. Remove the vanilla pod from the milk, and bring to a simmer. Pour 1/3 of the milk over the egg yolk mixture (to temper the egg yolks) , and whisk together. Pour the egg yolk mixture back into the saucepan. Bring to a boil while stirring constantly with a whisk, until thickened.

4. Remove the creme patisserie from the heat and pour into a clean bowl. Allow to cool for 10 minutes, and then incorporate the butter. Cover with plastic wrap and refrigerate until cool and set. 


Thoughts: Creme patissiere is smooth, rich and creamy, making it a favourite in the pastry world. Minor adjustments can be done to alter the pastry cream for your application. Increasing the amount of butter will make it creamier, but adding too much will make it too "oily". Instead of vanilla, you can easily make it into chocolate, lemon or other flavours. To make it less rich, substitute with whole eggs instead of just egg yolks. Although personally, I prefer to lighten it by folding in some whipped cream.

A versatile component with many uses -- as a frosting for cakes or making into Crème Diplomat then literally filling it into cakes (Hokkaido cupcakes). And of course, it is the classic filling in profiteroles or éclairs. Sandwich it with 3 pieces of pâte feuilletée and you'll have a mille-feuille (aka Napoleon). Fill a blind baked pâte sucrée with it, topped with fresh, seasonal fruits and you'll get an ever-popular fruit tart. Another irresistible option is to do that with berries. Perhaps the simplest way is to layer it with sponge biscuits, fruits, cream, maybe some jelly and you've just whipped up a trifle! A dessert without having to crank up the oven.


All blog posts and photos are properties of WhatToBakeToday (unless otherwise stated). Unauthorized use and/or duplication of these contents, whole or part thereof, without express or written permission from this blog's author is strictly prohibited. Excerpts and links may be used, provided that full and clear credit is given to WhatToBakeToday with appropriate and specific direction to the original content.